DIY Animation Machine from Cardboard
Published May 25, 2023, 5:20 a.m. by Courtney
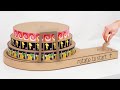
If you're looking for a fun and unique diy project, why not try making your own animation machine from cardboard? The Q is here to show you how it's done!
You'll need:
-A cardboard box
-A sharp knife or box cutter
-A pen or pencil
-A ruler
-A hot glue gun
-A motor (optional)
First, use your knife or box cutter to cut a rectangular opening in the top of your cardboard box. This will be the "screen" for your animation machine.
Next, use your pen or pencil and ruler to draw a simple frame around the opening. This will help keep your animation in place.
Now it's time to start animating! If you're using a motor, glue it to the back of the box (opposite the screen). Then, glue your first frame of animation to the front of the box, over the screen.
To create the illusion of movement, you'll need to take several different frames of your animation, each slightly different from the last. You can do this by moving your objects around slightly, or by drawing new frames entirely.
Once you have all your frames ready, glue them in place on the front of the box, over the screen. Make sure they're in order so that your animation plays smoothly!
Now, cut a small hole in the top of the box (near the screen) and insert a pencil or pen. This will be your "pointer" which will help advance the frames of your animation.
Finally, cover the back of the box with black construction paper or felt. This will make it easier to see your animation.
You may also like to read about: