The DIY Travel Trailer Project FINALLY gets an Awning - Part 23
Published May 27, 2023, 9:20 p.m. by Liam Bradley
After months of anticipation, the DIY travel trailer project finally gets an awning! This is part 23 of the series by homesteadonomics.
We’ve been waiting for months to add an awning to our travel trailer. The main reason for the delay was that we wanted to find an awning that was the perfect size, color, and style for our needs. We finally found the perfect awning and installed it ourselves in just a few hours.
The awning we installed is 12 feet long and provides plenty of shade for our entire family. It’s made of durable materials that will withstand the elements and it looks great too! We’re so happy with the final result and we know that it will make our travels much more enjoyable.
If you’re considering adding an awning to your own travel trailer, we highly recommend doing it yourself. It’s a relatively easy project that anyone can do with just a few tools. Plus, it’s a great way to save money since you won’t have to pay someone else to do it for you.
We hope you enjoyed this latest installment of our DIY travel trailer series. Stay tuned for more exciting updates as we continue to work on our dream project!
You may also like to read about:
foreign
[Applause]
[Music]
[Applause]
[Music]
guys today I'm revisiting the longest
running project on this channel which is
the DIY travel trailer project I think
this is four or five years in the making
so far and in this video I'm going to go
over the last major build that I'm doing
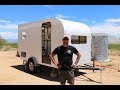
on this you can see it hanging off the
side it is a fold out awning so I'm
going to show you actually how I made
the Little Pony awning that goes over
the door and kind of mates up to the
larger awning and then after I show you
that I will fold out the large awning
give you a little walk around tour talk
about uh some of my thoughts on it uh
why it didn't quite come out the way I
was hoping but it will still be usable
nonetheless and uh at the end I will
give you more specifics on things that I
may not have covered uh during the first
portion
[Music]
[Music]
thank you
[Music]
foreign
[Music]
so you just saw a little recap of how I
fabricated that little mini awning that
goes over the door and the big thing to
note on that is that the construction I
used in that is exactly the same as I
used to make the larger fold out awning
with the exception uh that that larger
awning kind of folds in on itself but
you'll see that during the tour and then
the other uh note that I wanted to make
is you saw that I had kind of made that
Little Pony Awning or the the door
awning be able to fold back up onto the
roof but I am not having that store up
there because I was just a little unsure
of how my locking mechanism would Mount
and I've decided to just use the little
hitch pins to put it up there manually
just takes a couple of minutes and I
don't want to run the risk of highway
speed winds kind of getting under that
and potentially flipping it up and maybe
tearing it off so that's why that is one
thing just to remember so now I am going
to unfold this kind of set it up and
give you a little tour and then I will
let you guys go
foreign
[Applause]
[Applause]
[Applause]
[Applause]
thank you
well you just saw me set it up using the
One Man solo method and you may be
wondering how long that takes on average
well I've set it up easily over 10 times
now using that ladder method and it
takes about four to five minutes but if
I get my wife to help me it takes
anywhere from two to three minutes so
it's not that long of a process so now
I'm going to give you a little tour and
talk about some of the details on the
construction of the larger awning but I
want to answer a question that some of
you have probably been thinking about
the whole video so far is why the awning
does not extend on this side of the door
like you see a lot of RV awnings do well
that is just my lack of foresight in the
design process that was all in my head
during this build I didn't add enough
structure on this side of the door to a
fix one of those roll out awnings that
you commonly see on RVs and when I did
think about it I just figured I would
come up with some other solution like
this so anyway that's why it is it's
definitely not perfect but anyway I'll
show you the larger awning and uh
I don't know some of the details about
that now
so with both awnings set up you can get
a better look at the underside structure
the total size of the larger awning when
it's extended like this is eight foot
wide by eight foot extended from the
trailer and the smaller awning is three
foot wide by two foot extended from the
trailer and it has about a three and a
quarter inch overlap to help keep the
rain out on the upper side if you
remember from some of my older videos
the trim on the top of the trailer
creates a little bit of a lip so
anything that goes on the other side of
the awning will run off the front versus
come off the side
and then the structure of the larger
awning was the exact same welded
aluminum that I did on the smaller
awning with the exception that this
tubing is a little bit thicker it's inch
by inch and a half by eight inch thick
just because this is a larger structure
and just like the smaller one I sheeted
it in the painted 040 aluminum with VHB
tape and then one thing that I did
differently on this
is on these little intermediate sections
I used 16 gauge aluminum angle to help
save on weight and I just made some
little brackets and riveted them versus
welding
and the hinge points are comprised of
two galvanized hinges that I got from
Home Depot there and there and a quarter
inch heavier Duty hinge that I got from
Industrial Metal Supply on the middle
and those all support a total of about
67 pounds which is what I figured this
large awning to be as I mentioned
earlier
the aluminum shelf down here serves two
purposes one is to be simply a shelf to
put condiments or drinks or whatever
else as we are cooking
on the little slide out kitchen but it
also serves to Bear some of the weight
of this 67 pound awning as it is stored
against the side and I have some clips
I'll show you how those little Cotter
pens or the hitch pins go through the
bottom and then secure themselves into
this
as for the hinges on this they are just
standard Home Depot uh like gate
hardware hinges
um and they are definitely not the most
heavy duty I just have them riveted in
place but not to worry because when this
folds up
these little brackets that I made out of
inch and a quarter uh Channel
it folds up on itself and that bracket
lines up with that hole right there so
in addition to the hinges these lower
sections are also held in place by way
of those brackets with the little hitch
pins
and I think oh No actually that's not it
the last thing I wanted to address is on
the upper side of this awning there is a
garage door rubber flap like a garage
door seal that folds over the top of
this to seal out the rain
on this larger awning and I'll show you
some clips of that now look at the top
side of the awning with that little
Rubber seal that's just a garage door
threshold seal and this is attached to a
piece of one inch by three inch aluminum
angle that is attached to the top of the
awning by way of rivets and VHB tape and
when this door folds up this seal just
kind of rests on the top edge of this
aluminum trim on the top of the roof and
that already has about a quarter inch
lip so any rain that comes here runs off
and will run off past those solar panels
off of the front of the trailer
foreign
[Music]
foreign
[Applause]
so I think that's just about going to
conclude this latest addition to the DIY
travel trailer project but not to worry
if you have liked this project over the
years even though this is the last kind
of big build on it I still have plenty
of things bouncing around in my head
that I want to do to it I'm planning on
reworking the water system that I
originally installed with a foot pump
and a few other little things so there
will definitely be more content for this
in the future but this is just the last
kind of major thing however there were a
couple of things I wanted to cover that
I mentioned at the beginning because I I
kind of alluded to the fact that this
didn't quite come out how I had
originally hoped and that mainly is
because of two things the one I covered
during the little tour portion about not
having enough structure on the front
side of this door to have an awning a
single awning that would kind of cover
everything and then the other is uh this
wasn't quite as slick and as uh kind of
like transformer-ish that I was hoping
for in that I originally had planned to
be able to pull this out and those arms
that I have now just kept as uh single
straight pieces of aluminum I had played
around with some scrap pieces of
aluminum to see if I could have them
where they Bend in half and then when I
pulled it out they would kind of lock
straight and I tried a couple variations
and it just didn't seem like it was
going to be something that was Secure in
case we had some breezes come by so
that's why I kind of opted for the keep
it simple stupid method just to have it
take a couple more minutes to set up but
have something that would be a lot more
secure and uh
uh oh uh if I didn't mention it in the
uh
a little uh walk around tour the total
weight of that not including the hinges
that are mounted to the trailer is
approximately 67 pounds and uh it's all
aluminum so that does sound a little bit
like a decent amount of weight but as
you could see when I closed it up and
showed you the Locking mechanisms it
does stay on this pretty securely I
drove it up and down the road and
watched it my rearview mirrors going
over some potholes and it doesn't budge
at all so I find it to be pretty safe
and my other concern was the little mini
awning if I was storing it on the top
but I kind of already addressed the
reason why I am not having it store on
the top so as always I appreciate you
guys watching these videos if you liked
it give me a thumbs up and if you want
to see more content hit the Subscribe
button remember you can see my videos
YouTube Rumble
Odyssey and also for for those of you
who might want to get some more behind
the scenes kind of stuff I am going to
be opening up a locals community
and I'll post a link to it in the
comments when I do get around to doing
that but if you want to see more of my
personal life and things like that I
will post that in the comments when I
get it set up so I will see you