AWS Client VPN Tutorial - Setup AWS Client VPN from scratch
Published June 1, 2023, 9:20 p.m. by Monica Louis
This video demonstrate setting up an AWS Client VPN to access an ec2 inside a VPC.
IP CIDR Calculator: https://www.ipaddressguide.com/cidr
Chapters:
00:00 - the Intro
00:47 - the Explanation Diagram
04:56 - the VPC Setup
06:38 - the Subnet Setup
08:02 - the EC2 Setup
10:46 - the Theory | Connect to EC2
11:26 - the Client VPN Setup
12:21 - the Certificates
17:39 - the Client VPN continued
18:14 - the Theory | Split Tunnel
22:35 - the Client VPN continued
28:12 - the VPN Client Configuration
31:45 - Connect to VPN
More than ever today workers need to find a way to connect from their homes or offices to their workspace. For those working with AWS, the ability to remotely connect to AWS VPC and manage resources is essential.
AWS Client VPN allows you to connect from your home or on-premises network using an SSL/TLS connection. It is a managed service which removes a lot of overhead of managing 3rd party remote access VPN solutions. In this video, I'll teach you everything you need to know about AWS Client VPN as well as show you how to set it up with an Amazon Workspaces desktop running Windows 10.
#awsclientvpn #awsvpn #awsvpc #aws #cloudguru
You may also like to read about:
foreign
[Music]
in this video we will have a look at AWS
client VPN so we will use this client
vbn to access private ec2 inside a
private subnet inside a VPC so by
default if an ec2 is running inside a
VPC which is virtual private Cloud you
cannot touch that from outside or your
local machine so we will create one
client VPN and we will use a VPN
software to get into that virtual
private Network and then access the ec2
so if you are just interested in the
setting up the client VPN you can skip
ahead but I'm gonna actually set up VPC
ec2 subnets and all that stuff right so
let's go
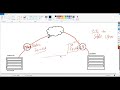
okay first thing first let's see what
are we going to set up in AWS right
first thing we're going to have a VPC
and inside that PPC we will have say a
private subnet and inside that we will
have Hoster ec2 right
so
for a user say
here and he wants to access this ec2
maybe there is some web app running or
he wants to get this shell access right
but because this all the cc2 is under
the VPC virtual private Cloud he cannot
touch that ec2 that's the purpose of the
VPC right so to solve this uh one thing
is to just have a Bastion host which is
to have another ec2 in a another subnet
which is a public subnet and then the
user gets the access to Bastion first
and then to the private so that's
another stuff but today we are gonna
look at the virtual private Network so
what it's gonna do is
um yeah so what we will do is we will
set up a VPN
here and when the user connects to that
particular VPN
um
the VPN gonna check
which
subnet it is associated with okay
and after that and next it's gonna check
which
uh IP ranges it is authorized to serve
basically right and the next thing if it
found or it is hit with the IP which it
is authorized to serve it's gonna check
its route how he can how the VPN network
can serve that particular route right so
that's the three things that VPN needs
to work right so when we want VPN to
serve this particular ec2 we will
associate this VPN with this subnet and
we will authorize The Cider range which
is maybe for the VPC
um
cider is the IP ranges that we have
defined for VPC subnet and everything
else right and a route is how it's gonna
reach to the ec2 or maybe which IP or
Source IPS are allowed right for those
actually it's going to check one more
thing here which is
the security groups if it is allowed
to touch
if it is allowed to touch those ec2s or
resources or not right so these are the
couple of things that
the VPN will check so coming to The
Cider right
what we are going to have is we will
have
10.0.0 slash say 20. it's
a lot of ips right
um
and for the subnet we can have say
10.0.0
slash say 24 maybe a couple of ips and
we will assign one IP to this guy not a
sign it will get it the private IP from
this subnet accordingly because we are
not attaching any elastic IP to it and
one thing to note here is that when
defining this VPN client
it's it needs a cider range and this
cider range should not overlap with this
VPC side Orange right so we'll go ahead
with the 20 right
you know I think enough of the theory
Let's uh set up the VPN and ec2 and all
this stuff
so coming to the console
um I'm gonna open up the VPC
and
let's create I don't have any VPC in
this particular feature so let's create
a new VPC
um
I'm Gonna Save My VPC and as we defined
we'll give it the range of
20
right so there is one tool I usually use
let me get that URL
okay so this is this is the URL I
usually or the calculator I usually use
so when we say we're gonna have this
range so you can put it here and say
calculate right so you're gonna get four
thousand IPS which is
a lot of ips
and this will be the range right so we
can
accordingly accordingly decide how many
IPS we need so if I just say okay
let's reduce the range
so now we are left with 256 IPS that's
how actually you
divide the cider ranges when creating
multiple subnets right so let's go over
24 and
I don't want IPv6 and let's create the
VPC
so this will
um
set up the VPC next let's create a
subnet
and we'll select my VPC and you further
range
now let's go with this particular
because I'm gonna have or maybe
26 so how many IPS I'll be having in
this particular subnet 64. so that's
enough for the demo okay so the zone so
this is good stuff
if you want to attach your virtual
private Network to multiple subnets
all those subnets should be in different
availability Zone you cannot associate
two subnets from the same availability
Zone to a single
client VPN endpoint okay so today we are
going ahead with only one so let's
choose this particular
and
oh this this is not the cider so I
should move it here and this is my you
say subnet one and
I should mention it private okay
and that's it let's create the subnet
hmm
and we have our subnet
we have our VPC now let's create
an easy to
let's go
ec2
so I don't have any easy to running in
this region so let's launch a new ec2
I'm gonna go ahead with the
Amazon provided Linux
and I'm going to choose obviously the
fruit here
um
so this is the VPC
and I'm creating it in private subnet
that we just created
so you see auto assign public IP is set
to disable which is coming from the
subnet settings before because we have
not done that setting if you want to do
that uh you might
edit the subnet settings and enable auto
sign public addresses right so this is a
private so I don't want any public IPS
uh
DNS placement capacity these are all
going to be the same now we
I am roll Let It Be
so let's go to the next step storage I'm
gonna go ahead with
this
um tags let's skip this for the demo
video and yeah the security group right
so say private SD
and for this
um let's actually remove everything I'll
I'll be adding the security group rules
later when we require them okay
according to our needs so for now
um
we don't have any rules in the security
group review and launch so let's launch
this ec2
um I don't have this Red Robin so what
I'll go ahead do is create a new pair
so demo VPN
I'm anyways gonna demolish all this what
we are setting up right now
so I'll save it to my desktop
and launch the instance okay this is
going to take a couple of minutes or
maybe
a few seconds
let's get back to the instance list so
this is in pending state
now what we have achieved is we have VPC
we have subnet and we have one ec2
running in there
okay what next okay so the next thing is
we want
to establish a connection between the
user and the ec2 so one thing is
straightforward you can use the pem
files that is the private key to connect
to the ecd ec2 and you need to open that
22 SSH port and you can easily connect
but
if you're having a team who are non-aws
users and want to connect to say a web
app running in ec2 right you don't want
to distribute that fem files to all
those users all right that's not secure
enough so what you do is you create a
VPN client and find so let's jump in
that so in the VPC section
you come down to Virtual private Network
and then client VPN endpoints okay and
here you create a new endpoint say
VPN
and you need to Define The Cider range
right remember we discussed this has to
be different from the VPC range so
better go with something like this right
so 20 0 0 slash another thing is the
minimum is the 22 blocks should be fixed
so if you are going with 36 this is not
going to work so we'll see another thing
you should notice that once this
endpoint is created you cannot change
this slider range so better
uh decide beforehand now the next part
is the server certificates
um
for that we actually need the
certificate generation tool that is
so let's search
for the steps
here are the certificates
Generations tabs
here before the mutual authentication
which means we will be authenticating
using
the certificates
okay so we need to download openvpn
right so I'm gonna go ahead and download
64-bit installer I'm gonna install
openvpn
so I'm going to customize it because
I want these SSL
utilities these easy RSA right so I'm
gonna install it now okay open your VPN
is installed next we need to fire up
these commands
okay so let's open up Powershell in
admin mode
let's go to
see program files open VPN easy RSA
and start
the easy RSS show next
we're gonna copy this command to
initiate the environment
oh we forgot the DOT
okay so the environment is initiated
build the ca chain
so we need to provide the CM that is the
common name so let's go with the ID
notes
all right next let's create the server
certificates
so it is written in the
to the file the private Keys Next
um
create the client certificates here you
can have your domain name and all that
stuff for this time I'm gonna just press
enter
okay
so we have client certificates and
that's all we need
next thing is we're gonna copy all these
certificates to a particular directory
let me do that I'll be back okay so I've
created a folders with the name search
and I'm gonna copy
the certificates from openvpn directory
so the first one we need is
pki CSR copy and paste next one is from
the issued we need two certificates the
server and the client
so these are the two certificates
let's copy them to
the directory and from private we need
both server and client
so we need these two guys
all right so we have our certificates
now in a particular directory
and next thing we're gonna do is we're
gonna import all these certificates to
our AWS instance okay
so for that
this is a command okay next we are going
to import
this these certificates okay I'm sure
that's for that let's go to this
directory
say
[Music]
um
search
and I'm gonna take this command
and paste it here
you must specify a region right
okay
let's try if I can
mention it like this
okay we have successfully imported our
certificate for the server let's import
the client certificate now
and I'm gonna mention region Us East one
so this is it so we have imported both
the certificates and we can verify that
in our
ACM which is certificate manager
should go back to us each one okay we do
have our certificates now where are we
so we need to mention this
server certificates after adding them
you can click refresh you get the server
certificate and you need to click Mutual
authentication because you wanna
be authenticating using these
certificates so just select the client
now you can choose to enable the login
but for now I'm gonna not not gonna
enable this and also not the connect
Handler
the important thing right you can
mention DNS server I don't know how
these goes around but the very important
Point here is enable split tunnel okay
so I'm going to explain this to you for
now
so what happens is right so we mentioned
that our VPN cider range is in 20s and
our subnets and vpcs are intense right
so when a user
connects to this virtual private Network
the user is assigned one IP from 20s
right maybe he will get say
20.0.10.2 something like that right but
once we are into this network and we
want to get into the VPC
this VPN
actually translates cr20 series IP to
one IP taken from the subnets that is
associated to the VPN right so in our
demo we're gonna associate this subnet
so this VPN will translate
will translate the users 20 range IP to
the 10 range IP so that it can get into
the VPC so that's one part right
and once it has the 10 range IP it can
go in and it needs to find the route to
reach this ec2 so we will Define that
all
the request with the source of 10 IPS
can go to this particular ec2 that is a
route right and once
it finds the route after going through
authorized and security groups it finds
the route and it reaches the ec2 that is
okay that's what we want so you initiate
a SSH session for this particular ec2's
private IP you initiate it from here
your VPN converts your 20 range IP to
the 10 range IP you find a route and you
reach here that's all perfect but
now you are into this VPN and if you hit
in your browser say www.google.com
[Music]
the same thing will happen your request
will reach here at the VPN and you will
give get a 10 IP and next you are
finding a route to reach google.com but
you do not have google.com servers in
your VPC right and so it won't be
resolved and it won't be able to find a
route to reach google.com and your
request will fail
right
so
in short what this means is that your
users will lose that internet
connectivity on their machine once they
are connected to this VPN because you do
not have a route
so to solve this one thing is you can
define a route to say
0.0.0.0 and attach it to the internet
gateway right so say you attach
um
internet gateway to VPC and then subnet
has got that route one thing is that but
the problem with that is now if say if
in the morning the user has connected to
your VPN and all your 10 or 20 member
teams are using the VPN whole day it's
gonna
mess up with the bill you're gonna get a
huge bill why are you serving all the
internet traffic through your VPC
what's the purpose right so another
thing another option you have is to
choose and enable this click tunnel so
what this option does is rather than
matching the routes here
in the AWS environment when the user
connects to your network
these routes are gonna pushed to your
user client so these routes are gonna
pushed and saved in your VPN client
software at the user's machine right so
your VPN software will do the routing
and like if else condition checks for
example when you are going to do SSH to
this ec2's private IP
so these routes gonna match here okay
for this IP I should reach to this VPN
and then here
so it's gonna route here that software
your VPN client software you're gonna
route your
10.0.0.0 series request to the VPN and
for all other requests which doesn't
match the route defined here it's gonna
use your internet connectivity that you
have at your home
so this is why it is called
split tunnel because it is splitting the
VPN tunnel into two one where you have
defined the routes only for those routes
this tunnel will be used and for the
rest of the routes which are not defined
here your internet connectivity will be
used right makes sense so do click on
this option if you
want your users to be connected to
the internet next let's choose the VPC
and I'm going to choose the Private
Security Group uh poet is same I'm not
gonna have cell service portal but you
can this will generate a nice website
where the your team members can
download the client configuration but
you can just email them right so so that
is it so let's create once
okay so oh so this was the thing I was
talking to you that minimum range should
be 22 that's why we
just to check this error I wanted to
show you guys so once it should be in
the range of 16 to 22 I believe as of
the time I'm recording this video so
let's go with the 22 and let's create
with this VPN endpoint now the status
you see here is pending associate
because we are yet to associate the
subnet with this particular endpoint so
let's do that
um
in that go to the association tabs and
click on associate choose the VPC which
is my VPC in my case and choose the
submat of with which you want to
associate this
um
client VPN network so if you have
multiple subnets defined in your VPC the
one you associate are the ones you can
connect multiple subnets to your VPN
right so the ones you connect to the
vpns
from those cider
the IP will be translated by the VPN so
when the request is coming from here
with the 20 range and then this is going
to convert to a IP taken from the
subnets
and those subnets are the ones which are
associated to the VPN make sense
okay
so let's select this one and let's click
associate this is gonna take some time
around 5 to 10 minutes
so be sure to wait so we are going with
this Security Group
and for authorization
hmm
I'm gonna allow only the sidders are the
ciders the IP range
from let's go to VPC
so
let's say we have our VPC with the cider
range of this
and I am saying
in this authorization that this
particular client repeat C endpoint is
only authorized for
the request whose destination IP lies
between this range okay so if you want
to open up to the Internet just go with
the 0.0 stuff but I want this VPN
network
to only allow the request that lies in
between this range and you can very well
use that particular two two to check
this is the range so your easy to
uh instance should be lying between this
range in order to be
accessed by your clients okay
now
uh let's add the authorization you can
use
80 users to
restrict the user groups specifically
but for now let's go with allow all the
users
so next is the route table so we have
already
have the default route which is
tied to our VPC endpoint and that's all
we need so
this is gonna use the NAT for the
address translation which is internal to
the VPC so that is it now we have
defined the association we have the
security group we have the authorization
and we have a route to reach to our ec2
instance this is going to take some time
I'm gonna pause the video and come back
and one more thing while this is
this process is going on next stuff we
need to do is download this client
configuration okay download this file
all right so I'm gonna save it to my
desktop
and
I'm gonna open it with
vs code
okay
all right so one thing we want here is
that we this is the chain for CA right
we need to enter certificate and the key
for the coins right and for that uh what
we will do is I can show you the steps
as well
so this is to associate
the subnet and then this is to authorize
to access the particular Network
and some additional network if you want
internet access that's what I was saying
and download the VPN configuration right
so what you want to do is you want these
two tags
to be copy pasted Here and Now take the
content of client certificate okay so
let's go here so this is the coined
certificate
I'm gonna open it here
I'm gonna copy it all and paste it just
between these two tags okay
and next is the key which is the private
key of the client so this is the key I'm
gonna drop it here
copy
and paste it here right
so we have the key and the certificate
next thing is to assign a sub domain to
your
endpoint this is mentioned there
so I'm gonna go ahead with this and this
is all you need
for this client configuration you can
just forward this particular file to all
your team members and they'll be able to
connect to the VPN network so so another
thing so we believe I believe I already
have the openvpn installed so I can open
that
and
who is it running yeah it's running so
click on import and import file
okay and then choose this configuration
so I saved it on my desktop I'm gonna
choose
it from there where is my desktop
um
file is downloaded
config VPN I'm gonna open it
okay
and then you can get the option to
connect so let's see if that Association
has been finished or not where is
okay let's refresh that
it's still pending it takes time
so
um okay
so we have done this part
and then this is the random string I was
talking I mentioned the ID note so you
can mention anything you want and your
endpoint should be like this after the
modification and that's it you will be
good to go to connect to the internet
all right so we have got the status
available for this endpoint now
straightforward
looks okay for now obviously we won't be
able to do the SSH because we don't have
that rule defined in our security groups
but we should be able to connect to this
network and get a IP from the 20 range
and let's try to do that
so click on this click on connect
this is uh doing all the handshakes and
all that stuff
and
let's see
if it is yeah it is green and you can
see that we have the IP from the 20
range right
so
in order to check okay let me open the
console first
and I believe I downloaded
my pen file
to the desktop so in order to do the SSH
connection established assh connection
we need to mention that pen file
and then the user ec2 user and the
private IP
for the private IP let's go to instances
click and and this is
oh this is the private IP okay
so this is a private IP and copy this
this is not going to happen
right because
it is reaching till the security groups
so I'm gonna cancel this out so what's
happening is uh this has the 20 range
this is reaching here and then this is
translated to some tens IP and
Association check authorization check
because we have mentioned uh this range
for the authorization and it is fading
at the security group level
right so let's allow it through the
security groups
um security
inbound rules let's
check this
so this is the fun part right
either you can directly go with
um where is SSH okay this one 22 Port
you can say okay just allow SSH from any
IP or what you can do is because we saw
that this 20 range IP will be translated
to the subnet IP so we can actually use
the subnet as the source
the IP range of the subnet so we'll go
to the subnets
and we will copy The Cider range
of the subnet
so now the SSH will be allowed only
from the IP from this range right and
yeah see the rules
we should be able to connect
and yes we were able to reach the
network okay we hit okay this is related
to the pen file permission so what I'm
gonna do is okay now that's a challenge
if you are on Linux you can just use
change mode 400 and then the file right
but because I am on
windows so what's happening is right now
this is the permission for this demo VPN
right but if I try to change this this
is not gonna work I can show you it will
be something like 500 because
it doesn't work hard
yeah triple five okay so in order to
make it work I actually need to copy
this from Windows desktop inside my WSL
so let's do that
copy or CPM getting confused okay CB the
demo VPN to say the home
uh just copy it in the home right so now
let's do this and let's try again and
now I'm gonna run that command one more
time but remember this time I am
referring to the pen file inside my WSL
instance okay so this should work
all right we got it
so we are into
the
private instance using virtual
private Network connected using kind VPN
endpoint
so that was it
I hope you learned something
till next time
take care
[Music]
[Music]
thank you