Cheap DIY Ambilight TV Project with Hyperion and Raspberry Pi
Published June 2, 2023, 8:20 p.m. by Arrik Motley
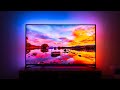
Building a cheap DIY ambilight TV with hyperion and Raspberry Pi has been on my radar for a long time, and today I'm finally getting round to doing just that, and I'm going to show you just how I did it! This is an alternative to the Philips ambilight range of TV's, or the Philips Hue play HDMI Sync Box using open source software called hyperion or hyperbian which runs on a cheap and low power Raspberry Pi controlling an LED strip such as a ws2812b or SK6812 and gives you ambient or bias lighting for your TV, and the result is amazing!
If you'd like to support me and future projects:
Patreon:
https://www.patreon.com/everythingsmarthome
Buy Me a Coffee:
https://www.buymeacoffee.com/EverySmartHome
PARTS LIST:
Raspberry Pi Zero W:
https://amzn.to/3cc3jjU (UK)
https://amzn.to/3180iuG (US)
https://amzn.to/3lFMvFe (international)
Raspberry Pi 3B:
https://amzn.to/39apgxT (UK)
https://amzn.to/396OgWI (US)
https://amzn.to/2P0KGGX (International)
SD Card:
https://amzn.to/2D8qDk4
4K Capture Card:
https://amzn.to/3tMn4EB (UK)
https://amzn.to/3gRbCnP (US)
https://amzn.to/3rapjjD (International)
1080P Capture Card:
https://amzn.to/3f6XW7s (UK)
https://amzn.to/319nTvd (US)
https://amzn.to/2QtRcGx (International)
HDMI Splitter:
https://amzn.to/3fbRKeu (UK)
https://amzn.to/3cfPxwN (US)
https://amzn.to/3vMklwO (International)
LED Strip:
https://amzn.to/3lI3nuZ (UK)
https://amzn.to/3rcKPE7 (US)
https://amzn.to/3tMqNSL (International)
Alternative LED Strip (RGBW)
https://amzn.to/3rawgBf (UK)
https://amzn.to/2QBVa05 (US)
https://amzn.to/3fcv7qj (International)
Power Supply:
https://amzn.to/3w1y2Z9 (One I used)
https://amzn.to/3tN2CUb (International)
Barrel Jack Connectors:
https://amzn.to/31b1Unr
Wiring:
https://amzn.to/3acqhEV
Written Article:
https://everythingsmarthome.co.uk
EVERYWHERE YOU CAN FIND ME:
Everything Smart Home Community Discord:
https://discord.gg/Bgfvy2f
Twitter: https://twitter.com/EverySmartHome (@EverySmartHome)
Instagram: https://www.instagram.com/EverythingSmartHome/
Facebook: https://www.facebook.com/everythingsmarthomeofficial/
#smarthome
________________________
Some of the links above are affiliate links, where I earn a small commission if you click on the link and purchase an item. You are not obligated to do so, but it does help fund these videos in hopes of bringing value to you!
You may also like to read about:
[Music]
biased lighting is something i've wanted
to do for years
ever since i first saw the philips
ambulate tvs back
in 2017 and whilst there is software out
there to do it
i could never seem to find the hardware
required for my setup
at a reasonable price until recently
when i was browsing amazon to find parts
for this project like i occasionally do
and i finally found a capture card that
could
fit all of my needs and seem to tick all
of the boxes
meaning i could finally get started on
the diy ambulate project
i'm going to show you how exactly i did
it in this video
for around 75 pounds before we get
started i do want to mention that this
isn't a full in-depth tutorial like we
normally do
but more of an overview of the entire
project and how i did it for my exact
setup
you will definitely be able to follow
along and see what i did and replicate
it for yourself
but we're not exactly going to go deep
into the weeds on this one
if there's enough interest we can
definitely do a full in-depth tutorial
be sure to let me know in the comments
down below if that'd be something you're
interested in
and uh whilst you're down there you may
as well hit that like button and get
subscribed if you aren't already
before we get into the setup it's worth
talking about how the ambilight or bias
lighting project works
and also the exact hardware i used for
my setup
and it's actually pretty simple
essentially there is an addressable rgb
strip that goes all the way around the
backside of the tv
and this is being controlled by a
raspberry pi running some software
called hyperion
and hyperion is an open source project
that i first heard about back
in 2018 i think and essentially it's the
brains of the operation it takes the
image that is being currently displayed
on the tv
analyzes it figures out all the colors
and then controls the led strip
in response to that on-screen image it
runs on a raspberry pi like i mentioned
and it's very customizable and it's also
pretty easy to set up
you can run it on any raspberry pi i'm
using a raspberry pi
3b but i'm planning to move to a
raspberry pi
0w very shortly you're probably
wondering how the raspberry pi gets its
image from the tv
and that's by using a capture card to
intercept the source media
and this is definitely the piece of the
puzzle that put me off doing this
project for the longest time
we consume pretty much all of our
content on netflix or amazon
or youtube or plex at 4k hdr
and so finding a capture card that can
do 4k hdr
pass through as well as hdcp 2.2
at a reasonable price was very important
to me
and i could never seem to find one that
ticked all of those boxes
it wasn't actually the 4k hdr that was
the hardest to find
it was the hdcp 2.2 because without this
any content from netflix or amazon will
just display
a black screen but then i finally found
this capture card on amazon
that ticked all of those boxes it's a
bit more expensive at 59.99
but if 4k hdr isn't important to you
which i know it isn't for a lot of you
guys
then you can definitely find ones that
will do this exact job
for less than half of the price of this
one i'll have the
links for everything you need in the
description down below as always
the led strip i used was the classic
ws2812b
which runs at five volts and this is
ideal for pairing with the pi
which also runs at five volts meaning i
can use one power supply to power both
the pi
and the led strip and i don't need to do
any voltage stack down
the led strip i have is the 60 leds per
meter
which i think is the sweet spot between
luke's
and also power consumption finally i
grabbed a 5 volt
8 amp power supply with barrel jack
connector some
female barrel jack connectors with screw
terminals
and a tiny bit of wiring i'm using
roughly four meters of
leds on the back of this 50 inch tv
and according to the calculations i
would need roughly 14 to 15 amps of
power
however the only thing i could get my
hands on at the time
was this 8 amp power supply and i've
seen some
indication from some other youtubers
that are much smarter than me in this
area
that you can actually get away with less
so i decided to give it a go and i
haven't had
any issues since but just make sure to
research your power supply and your
power requirements
before you buy your power supply the
first step was to install the led strip
around
the frame of the tv and i tried to get
these as close to the edge as possible
for the best look
at the corners instead of cutting and
soldering like is the proper thing to do
i just kind of folded them over
themselves like this
i decided to start and end my led strips
right in the middle of the bottom of the
tv
because this lined up nicely with where
i wanted to place the rest of my
components
i then used some command hook strips to
stick down my capture card
and also my raspberry pi yes i velcroed
a raspberry pi to the back of my tv
don't worry it's just temporary i then
plugged my chromecast into the hdmi
input of my capture card
and i took the hdmi output and plugged
that into the hdmi port of my tv
i then wired the usb port of the capture
card
to the usb port of the raspberry pi with
everything in place it was time to wire
everything up
i say that like it was a big task it was
five wires
i started by taking a micro usb cable
and cutting it
in half exposing the five volts and
ground wires which are the red
and black wires this allows me to power
the pi
via the micro usb port instead of the
gpio pins
you can do either but the advantage of
the micro usb port is that it has
over voltage protection built in whereas
the gpio pins
do not i connected the plus and minus
wires from the micro usb cable
into the screw terminals of the barrel
jack connector
along with the plus and minus wires from
the led strip
you'll notice i'm using a common ground
wire here
meaning that the ground from the led
strip and
also the pi are connected to the same
place
this is very important otherwise you'll
get a caesar inducing flicker
from the led strip finally i connected
the data wire of the led strip which is
the green wire
to gpio18 of the raspberry pi
with everything wired up i then inserted
my sd card into the raspberry pi
that had already been flashed with
hyperbane which is essentially raspberry
pi os
with hyperion installed you don't have
to do it this way if you don't want to
if you have
something running on your pi already you
can simply install hyperion from your
package manager
with the sd card inserted i then plugged
in my power supply
and let the raspberry pi boot up after a
minute or two i was able to find the ip
address of my pi
on the network and log in to the web ui
located on port 8090 after that it was a
simple case of telling hyperion a few
things like
what led strip i was using how many leds
i had
what position they were in and the
orientation
and then enabling my capture guard after
that i loaded up some
content and it was off to the races at
first i was a little
underwhelmed by the reaction speed which
was a little bit slower than i'd hoped
for
although i am very sensitive to this but
after playing with some of the capture
card settings
i was able to get a much nicer and
smoother experience
the key one for me was actually lowering
the capture card resolution
from 1080p down to 720p
after all all the capture card needs to
see is the colors
it doesn't actually need a good quality
image
it just needs to be able to see the
colors in order to change the
leds lowering the resolution of the
capture card
does not impact on the image that you're
actually getting on the tv
and the end result is actually something
i'm very happy with
i actually find it does add to the movie
watching experience which i was actually
um a little bit surprised about i didn't
expect it to add much to the experience
but yeah overall very happy with the
image i actually think it comes off
more distracting on camera than it does
in real life
in real life you get used to it very
quickly um and yeah it does provide a
very nice
movie watching experience and the nice
thing is that it's very customizable you
can completely turn off the leds for
certain types of content if you don't
want it and you can also set the leds to
be different effects
or you can even set it to a constant
back color instead of changing with the
image
you can just have a constant led color
up on there if you
want to maybe reduce some of the strain
on your eyes
one of the best things about it is you
can add it into home assistant
using a local integration and that
allows you to completely control how it
works
and using automations or from the
dashboard
but there we go that's how i built a
bias lighting system
for around 75 pounds and you can
definitely do this for
much cheaper if you use a 1080p capture
card instead of
4k hdr if 4k hdr isn't important to you
then just use a 1080p one and the price
will be much
lower um if you want to add multiple
sources
into the system so if you want to have
an xbox and a fire stick and a
chromecast and
a blu-ray player all feeding into the
um ambi light system then you can use a
hdmi splitter
and that will allow you to have all of
these sources available
in hyperion i'll leave links to all the
exact hardware i used
as well as some other sensible hardware
recommendations
in the description down below that you
can check out and if you decide to buy
it will help to support the channel at
no additional cost to you
but that's about all the time we have
for this video hope you guys enjoyed it
uh let me know what do you guys think
about this project i'm personally very
glad
i got around to taking this one off the
list so let me know if you plan on
making one
in the comments down below if you want
to support the channel you can do so by
becoming a patron on patreon
and your support allows me to keep on
buying the hardware
to make these videos thank you to all my
current patreon supporters
your support is very much appreciated oh
and let me know if you want me to do a
full
tutorial or full in-depth guide on this
um diy bias lighting project we can
definitely do
a more in-depth video um
if you guys want to see it so do let me
know in the comments box down below
thank you so much for watching this
video as always make sure to drop a like
and hit the subscribe button if you
aren't already thank you for watching
and i will see you in the next video
[Music]