DIY TENNIS SKIRT/PLEATED SKIRT (with inside short)
Published July 19, 2023, 5:20 a.m. by Naomi Charles
Hi everyone,
My name is Jess and I love making clothes in a simply but pretty way.
Welcome or welcome back to another requested tutorial. Lot of you have asked for this skirt. And here it is.
To make this diy, please check out my basic information below:
1- Sewing machine: Merrit Joyful Sewing
2- Material: 1.5m fabric of lightly woven polyester
3- My body measurements: 82-66-92. I'm 165cm
I made this skirt with an inside short/pants so that one who worry of wearing a skirt that is too short and can show the butt. But if you don't want the inside short, just skip that part.
This skirt is so on trend now and in fact you can create so many different looks with this skirt. That's why I'm so in love with it after finishing. Even I thought it's quite too young for me in the beginning, haha.
I hope you like this diy and subscribe to my channel for the upcoming one.
Be a part of my sewing journey here https://www.jessdangdiy.com/
And stay connected on social media with me here:
- Instagram: https://www.instagram.com/jessdangvn/
- Pinterest: https://www.pinterest.com/JessdangDIY/
- Facebook: https://www.facebook.com/jessdangDIY
For business, please send to my email: jessdangdiy@gmail.com
Have a great day guys!
Music: Folk Bed
Musician: music by audionautix.com
License: https://creativecommons.org/licenses/by/4.0/legalcode
Cheers,
Jess
You may also like to read about:
I used 1.5m of tightly woven polyester fabric for this DIY. So I can make the pleated part easily.
The first step, I'm cutting a long rectangle with 40cm length which is the length of the
skirt I want. It's the length from the belly button to where you want.
And the width of the rectangle is 3 times your waist size + 10cm.
From the top, I go down 12cm and draw a horizontal line. It's the length of the
pleated part that I'll sew later. In my opinion, don't make it longer than that.
At the top, I mark at 2cm from outside first. Then from that mark,
I make another mark 4cm away from each other. I do the same for the horizontal line as well.
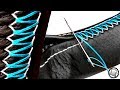
Now I'm folding the group of 3 marks together to create the pleated part. Folding the same
for the top and the horizontal line. Use the pins to hold your folding.
Keep folding until the width of the folding is the same with your waist size.
However, the width of the folding at the horizontal line needs to be longer than
the upper line. Because it's the part under your belly and above your butt.
So I move the folding at this line a bit to make it longer. Make sure the total width of
this folding line will be the width of your body at 16cm under the belly button + 1 cm
After that, I use the pins to fix the folds between 2 folding lines.
Then sewing these foldings to create the fixed pleated part.
After these seams, I make one seam at the top
to keep all the foldings stay at the same side and not move around.
I cut at 2cm extra at 2 sides of the skirt for the zipper later.
At the end of the skirt, I fold the end fabric 2 times to hide the cutting and to finish the hem.
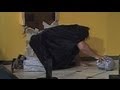
Now it's time to make the pleated for the rest of the skirt under the foldings. I fold
them together to make sure it's nice first. Then I use the iron to create the pleating.
Next step is making the pants inside the skirt. If you don't want to make it, you can skip this part.
I cut 2 rectangles with 32cm length which is the length of the skirt - 8cm
and 69cm width which is 1.5 times a half of the hip size.
At the left side, I'm drawing a straight line at 5cm inside.
Then I connect this line to the outside line at 5cm upper the end.
At the right side, I do the same but with the straight line at 8cm inside.
After that, I draw another line at the middle between 2 straight lines
to divide the pants to 2 parts, the front and the back pants
After cutting, I sew 2 crotch lines of the front and the back pants together.
Then I connect the front and the back pants at 2 sides and at the end of the crotch after that.
However, at one side of the pants,
I mark at 18cm from the top. It'll be the zipper area later. Then sewing.
I fold the end fabric at the leg of the pants inside to finish the hem. And sewing.
Because the pants will be put inside the skirt. So I need to make the waist
of the pants meet the waist of the skirt. I measure the waist size of the pants first.
So I can know how much extra fabric I need to fold in. And in this case, it's 16cm different.
So I make 4 foldings with 4cm each one at 2 sides of the pants.
Whatever you do, just need to make sure the waistband of the pants has to be the same with
the waistband of the skirt, including 2cm at 2 sides of the skirt as well.
Now I'm connecting the pants and the skirt together at the waistband
and also at the zipper area. Then sewing
I use an invisible zipper for this skirt. Fix one side of the zipper to one side of the skirt first.
Then fix another side after. And sewing.
After that, connect the fabric under the zipper together to finish this part.
The next step is making the waistband for the skirt.
I cut a rectangle with 10cm width and around 70cm length
which is the length of the waist size + 6cm.
I use the lining to make my waistband thicker. So it'll have a nicer form for the skirt. But you
don't have to do it if you don't have the lining. Connect the waistband to the top of the skirt
first. Remember to keep a little extra fabric at 2 sides of the waistband to fold in later.
After the first seam, I fold the other edge of the waistband inside around 1cm first.
Then fold it over the first seam to hide the sewing. At one side of the waistband,
I make it a little longer or over the top to have the space for the buttonhole later.
Then sewing.
Last step is installing the button and making the button hole.
And I finish this DIY, here's my final result.
When I first started making this skirt, I didn't think it would be so cool like this.
Now I know why it became so popular. You can create so many different looks with this skirt.
I hope you like this DIY and subscribe to my channel for the upcoming one. See you next week.