This Trick will make Your Videos look like Movies.
Published June 7, 2023, 4:20 a.m. by Courtney
Download my Luts here: https://film-space.com
Join Filmspace: https://film-space.com/pages/filmspace-platform
In this video I go over a technique called halation. I go over the technique in Davinci Resolve and showcase how I use it. This technique is used in many music videos and movies trying to imitate the beautiful glow that it's all about.
Contact me:
Insta @justkay: https://www.instagram.com/justkay/
Email: Management@justkay.co
info@filmspace.com
Filmspace:
https://www.filmspaceproductions.com/
https://community.film-space.com/
info@film-space.com
- My Luts that I use on every clip: https://film-space.com
My Gear:
- Black Magic 6k, Sigma 18-35 1.7, Canon 100mm Macro 2.8, Tamron 24-70 2.8 & some Canon FD vintage lenses.
- DJI Avata & Air 2S
- Zhiyun Crane 2S and Ronin RS3
My Monitors:
- Colorpro VP2776 at home and Colopro VP16-OLED when traveling for Colorgrading
My Music:
- I use Musicbed for Music: https://fm.pxf.io/c/3830586/1347628/1..., Use code JUSTKAY at checkout to receive 1 month free when you purchase an annual subscription.
- My Musicbed playlist: https://fm.pxf.io/doxjb7
- I also use Artlist for my Music: https://artlist.io/artlist-70446/?artlist_aid=Kayphoto_482&utm_source=affiliate_p&utm_medium=Kayphoto_482&utm_campaign=Kayphoto_482
My software for planing videos:
I use Milanote for planning and pre-production: https://app.milanote.com/1Pet0T1AkGwV...
Subscribers: 230 epic people.
#cinematic #filmlook #filmemulation
Documentary, cinematic video, Colorgrading cinematic video, colograding cinematic short film, sam kolder ,travel filmmaker, travel video cinematic shara, sahara cinematic,drone mountains video 4k,travel cinematic video,travel drone video cinematic,cinematic video 4k, niklas christl, yes theory, peter mckinnon, film look,cinematic video 4k nature,cinematic short film nature, a cinematic short film, justkay,cinematic drone videos,dji mavic 3 cinematic,dji mavic air 2s cinematic video,drones,dji, cinematic 4k drone videos, travel filmmaker, travel cinematic video 4k, cinematic drone videos, movie film look, justkay film emulation
You may also like to read about:
[Music]
creating images that feel like they're
out of a movie has always been a dream
of mine
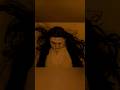
when you see a video that was shown on
film you sometimes see a blurred halo
around the highlighted areas
it's an effect called halation and it's
something digital cameras don't provide
so what if I told you that there is a
way to achieve this look that so many
people absolutely love
halation is a beautiful effect to mimic
so pay close attention and let me show
you exactly how it's done today
[Music]
chelation is a visual effect that shows
when shooting on film that is most
evident as red orange Halos that usually
appear on the contrasting edges of
Overexposed areas
when light hits the film stock you
generally get this blooming that it's
all about most often around the bright
light sources and the Elation is usually
very visible in night scenes in front of
us is a frame from the film Top Gun
which was filmed in 1986 and if we zoom
in on the fragment with light sources we
will see the classic halation Halos pay
attention to the border of overexposure
the Halos have an orange tint and as we
move away from the border they turn red
when light hits the film stock you
generally get this blooming that it's
all about so without power great in
DaVinci Resolve we will now mimic the
processed film by adding the digital
glow let's get into it and pay close
attention alright let's now open DaVinci
Resolve and start editing as you can see
we already have a color graded clip in
the timeline that we're going to use to
apply the Elation effect to I have found
that the best results can be achieved by
placing the Elation Effect Note at the
end of the note 3. now you open up the
ofx effects Library query find the
halation effect and drag it to our note
let's immediately rename it to remember
the effect and where it's placed
in front of us is the Elation effects
menu now leave the processing color
space set to use timeline click the view
isolated regions and then use the
Trestle slider to get to the point where
we can see much less detail on the
subject's face then turn off view
isolated regions again and use the
strength slider to increase the value on
the die layer reflection step the
strength parameter is responsible for
the brightness of the reflections of our
effect in our example we settled on a
value of 0.686 the values above seem
very strong and the values below do not
allow the effect to manifest as much
therefore the value of 0.686 is optimal
for us in this case now let's move on to
the spread slider and adjust it simply
put spread determines the scope of our
effect after experimenting with the
spread value I decided to stop at 0.220
and now it's time to reveal our secret
ingredient for the perfect halation
effect click on the item fine tune
relative spread and adjust these
parameters per channel the first thing
we're going to do is decrease the blue
spread value
in our case we will settle with 0.2 for
Blue's breadth since we want more red
and less blue we will increase the red
spread to 1.7 green spread in our case
we will leave it unchanged
the main thing to understand is that
with these three sliders we can adjust
the U of our effect
and in our case we will settle for 1.7
for red spread 1.0 for green spread and
1.2 for blue spread to make sure that
the Elation effect applies only to the
brightest areas let's click on view glow
alone it shows the areas that are
affected by our effect well we can see
that our effect only affects the
brightest part of the image so we can
leave the default values however if we
wanted to reduce the spread of the
effect we simply need to increase the
reduce highlights value to the level
that suits us
it is important to remember that
halation is a tool that is meant to
finish the material and it should not be
very conspicuous
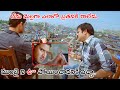
and now let's see what the material
looks like before and after
and I think it looks great so now we can
copy the Elation node and apply it to
another clip let's try to do this
so here we have another clip and we're
going to apply my look to it so that we
don't have to grade it from scratch and
now we're going to paste the Elation
effect to it
I think it looks great however sometimes
we will need to reduce the strength of
the effect to make it look realistic
let's reduce the strength of the effect
a little in the global blend tap in our
case we will stop at 0.750 which makes
the effect look organic
so yeah that's the hilation effect if
this video was a little bit fast I
suggest you go back and watch it again
and use it as a reference for grading
your own clip so just have it on the
side when creating your own clip so you
can follow along exactly if you want to
download the alerts that I use on a
daily basis you can go to the link in
the description to check them out and
here are some before and afters when
using them these clips are showed with
Blackmagic generation 5 red and log
formats
foreign
[Music]
so yeah that's it for this tutorial and
please let me know a suggestion for
further tutorials on color grading in
the comments or anything else I'm
heading to maritania in two days to
shoot a film for my main channel so yeah
stay tuned for that and hopefully I can
continue uploading weekly on this
channel as well