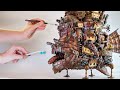
I made a Miniature HOWL'S MOVING CASTLE out of junk // Ghibli Crafts
Published June 8, 2023, 1:20 a.m. by Arrik Motley
Howl's Moving Castle. It's big (21" tall). It's heavy-ish (4.2 lbs). It's made out of junk (mostly). Help yourself to a full breakfast and strap yourself in to the merry-go-round of life for almost a full hour. In total, this project took roughly 300-400 hours spread over 60 days to complete.
Support me on Patreon: https://www.Patreon.com/StudsonStudio
Make a one-time donation: https://ko-fi.com/studsonstudio
More pics on Instagram: https://www.instagram.com/studsonstudio/
This is episode four in an ongoing series on crafting various things from my favorite Studio ghibli films. Stay tuned for more episodes!
And a HUGE thanks to all the support from everyone on Patreon!
HEY YOU! The song at 42:47 is Miika's Journey by Lama House https://youtu.be/tfCwlUlGLUk
MUSIC CREDIT: Special Thanks to @demongummies for the use of their lo-fi ghibli remix, "Let's Ride the Merry-go-round" at 47:32 and 47:56 Check out their soothing jams!
YouTube: https://www.youtube.com/channel/UCKRR_uODeDynIGUnPscb6MA
Spotify: https://open.spotify.com/artist/186Z7vh8tdbrO3V9ZZIMoJ
Instagram: https://www.instagram.com/demongummies
TALENTED CREATORS MENTIONED IN THIS VIDEO
@ScratchBashing
@BillMakingStuff
@MechanicalFiend
@EricsHobbyWorkshop
@Miscast
- - - - -
CHAPTERS
00:00 - Intro
00:34 - Forming the body from trash
04:55 - Bringing out the big guns (turrets)
08:13 - Sophie's Balcony
10:02 - How far are we? I'm lost.
11:06 - The castle has ears
11:52 - A Dirty Mouth
13:11 - Facetime (nose and lips)
17:18 - Wizard bath water
18:12 - These hips don't lie
19:02 - House attachments (Howl's Walking Suburb)
21:23 - Wing Zone
23:17 - Backdoor & booty
25:19 - The soft underbelly
27:29 - Chim-chimney chim-chimney
28:22 - The Howls Have Eyes
29:10 - Pendragon's Penthouse
30:35 - Take me to church
31:11 - Metal Gear(s) and 2(many)Chainz
32:35 - The crow's nest
33:54 - Legs
35:16 - PRIME TIME
35:44 - Painting at last...
37:09 - Mmm, creamy (painting the houses)
38:06 - Rooves
38:59 - Bricks on bricks on bricks
39:32 - It's plastic, but METAL
41:21 - I'm an oil man (washes and weathering)
42:39 - ASSEMBLING EVERYTHING (the best part)
46:41 - Flocking and final weathering
47:52 - The Beauty Shots
51:41 - Dog-scale
- - - - -
Special Thanks to hayao miyazaki and Studio ghibli's Howl's Moving Castle aka ハウルの動く城
All Howl's Moving Castle movie clips protected under fair use by way of education and research
#HowlsMovingCastle #StudioGhibli #crafts
You may also like to read about:
this video brought to you by the support
on patreon
hey studs welcome back to studson studio
today i'm crafting this house moving
castle model out of junk and whatever
else i can conjure from the trash can so
we've got a lot of work to do
look at this beautiful mess first time i
set my sights on it i knew i needed to
try building it
this is going to take the full force of
my garbage collection since i'm going
for a size that still comes pretty close
to tabletop scale and i know you're
wondering about dog scale it'll be about
the size of one birdie
we'll start by assembling a loose body
shape using trash
after months of hoarding plastic i
pretty much ended up blowing all of it
on this project starting with the grand
prize you get for eating a gallon of
kimchi you can almost envision how this
big oval will soon become a walking
castle
get that out of here
one of the things i was most worried
about was having strong hips to support
the weight that will ultimately rest on
the castle's chicken legs
i used way more hot glue than you can
actually see the only thing left to do
now is to paint it clear atomic purple
so we can see the insides
noodles now i've only seen the movie but
as i understand it the book describes
the castle as four looming towers
bespelled to hold together around an
instant bulgogi udon bowl
i also have tons of these instant rice
bowls one of which will be used to plug
the neck hole here
okay
and another one will be bisected to
become the bones of the castle's jaws
all of these additions are just for
bulking out the general shape of the
castle so i wasn't too concerned with
being quick and dirty and just gluing
random junk together solid dressing
bottle the back of the castle has a
platform that sort of tapers up and
outward so i'm adding an extra rice bowl
here which will be covered in bricks
later check out this nut jar
[Music]
the top and bottom have an ideal bulbous
taper for wizard architecture the castle
turrets seem to get wider as they rise
which is important because wizard
aesthetic is to build things that look
like they'd fall apart as soon as
they're released from their spells
[Music]
the noodle bowl ended up not being quite
tall enough so here's an inch of foam
carved to taper upward to add more real
estate for the central turret
[Music]
this christmas bobble will be the bones
for the domes of each turret make sure
to carve this side into magneto's helmet
to fit this very specific space
here's another nut jar for the central
turret as you are learning about all the
food i put in my body
this container could stand to be a
little more thick though so let's bulk
it out with a layer of foam board that
will wrap around with hot glue
quick balance test
bad
we'll make the legs later but for now
these cardboard kickstands temporarily
hot glued in place are enough to keep
the castle upright
this big smile is another rice bowl for
the front turret but it's a bit too flat
on the top so i'm going to use a piece
of this apple crate somebody in the
comments mentioned how it seems
unnecessary that apples are sold in
plastic and i agree but these wasteful
apples are great for crafting
i'm plugging up this nut tube with a
cardboard cap here a wizard and then
topping off the rest of the turrets with
a couple more domes
the transition from the castle face to
the turrets needs to be a little more of
a gradual slope so i'm bulking out the
upper lip with a foam strip then using
strips of hot glued paper board to get
the general shape
the silhouette is looking pretty alright
but i don't like this jar dimple on the
back here so i need to cover up that
booty but don't worry you still get to
see a little booty
on the rice bowl back here i wanted to
add a little cobblestone patio that in
hindsight you'll never actually see
because of how much junk it gets covered
with i've talked about this specific air
dry clay before but i've decided i
actually love how bad it is i can't get
it to not crack while drying but the
cracks always end up looking like free
weathering
i'm using a classic recipe for making
foam bricks after a medium dice they're
aggressively tossed in a dressing of
rocks
this will take it from this to this
wow
with bricks it's kind of looking like a
castle now they call this a castle i
carved a faux stone foam battlement
around the cobblestone area then i
finished up the bricks around the
backside but they really feel like
they're missing a little something
[Music]
the back side just like the face side
gets a paper board strip treatment to
blend the jars into an overall more
cohesive blob
and now it's time to bring out the big
guns
my neighbor nancy dropped off a large
offering of these conical lids which
will make excellent cannons for the top
of each turret and they just so happen
to fit in these dollar store game pieces
which will help the cannons look
properly mounted on each dome
[Music]
it was hard to film this next part
because the clear plastic is kind of
invisible to the camera but for each
dome i cut up pieces of this apple
container to make mini overlapping
layers of metal plating then i accented
each plate with an overindulgent amount
of rhinestones as rivets
[Music]
suddenly way more than i planned on
doing it was at that moment he knew he'd
have to continue placing rivets at a
consistent level of detail
[Music]
the bottom of the apple container has
what i guess you'd call feet which have
this very cute dimple that will work
very nicely as turret armor to hug up
nice and close to the cannons
more bricks
and then another little baby cannon made
out of a glue cap
tofu containers yes i'm using just a
small piece of the corrugation as an
inset for gluing into the foam which
will later house some sort of tube
detail
i just can't stop eating nuts if they
keep supplying me with these beautifully
beveled jars
the best trick i have is to try to use
the geometry of these plastic containers
to your advantage by fitting them around
the geometry of your model
it's kind of like making up a model kit
on the fly
oh and here's the promised tube for that
inset i mentioned and then a piece of
riveted rice bowl for this little
section
but we can't forget this little turret
hiding over here
the cannon i believe is a piece of a
plastic spray bottle no rivets rivets
now we're flipping back over to this
turret which confusingly looks like all
the rest of the turrets but hopefully
this context helps as we jump around to
various sections of the model this tower
like the others features cannons and
overlapping pieces of recycled plastic
as metal plating
if you're a gun pla builder you might
recognize this side skirt from the
ultron gundam which i'm using as a
little input where a pipe section will
be connected to later
next we'll need a fire demon to help
bend some plastic oh what a pretty fire
this gundam beam rifle is now just some
generic pipe detail
do you like my bracelet it's just some
plastic and rhinestones that will be
more flattering on the castle as a strip
of riveted metal to help break up these
two sections
hungry
oh did you know you might have some
crafting supplies in your fridge take
out containers like these sometimes have
very interesting textures that make
somewhat convincing metal plates after
you add a few rivets and pipe details
which i'm making from this lollipop
stick
if you're working with fire and plastic
make sure you're in a well ventilated
area and wearing a mask this plastic was
thin and soft it only took a quick
second to heat up to be bendable but i
still mask up just in case and here we
are back on the turret on the other side
just to confuse you i refuse to tell you
what i'm doing because it's the same
techniques as what was done on the other
side but i will tell you about what i'm
doing here which is making a ladder out
of pieces of styrene rod and armature
wire
okay suddenly we're going to work on
something different because i got bored
and wanted to make the balcony where
sophie says wow water
i'm using coffee stirring sticks here
and thinking a few moves ahead by making
more deck than i actually need but you
can never have too much deck as they
always say then use something heavy to
weigh the wood down as it dries
in all sincerity thank you very much for
this
now back to the deck
slice off just the portion that you need
and then for the metal railing use some
metal railing
the balcony will later get attached to a
building portion which i carved out of
foam off camera i gave it a black paint
and mod podge coating then made a few
door and window details using coffee
stirrers
for the rivets i have these tiny tack
nails which i'm stabbing right into the
foam after a micro dip in pva glue
i made the canopy by heavily mod podging
this piece of fabric then masking out
the stripes so i could splotch on the
alternating red stripes with craft paint
we'll set this piece aside for now so we
can work on this tall glass of water
over here
i sculpted this zveldt structure out of
foam using a craft blade and a pencil to
help accent the brick and crack lines
for the roof i made rows and rows of
shingles using a method i first learned
about from eric's hobby workshop if you
alternate the shingles like this you can
give preferential treatment to just one
row of shingles with a little trim which
will add a lot of nice variety in
shingle length once all the rows are
glued down
i made a set of window shutters by
splitting coffee stirrers in half then
gluing them down with a wisp of
breathing room between them
the other windows are too round to use
coffee stirrers so i sliced out the
window panes using a craft blade and
some scrap paper board for the bottom of
the building it's more coffee stirrers
then chunks of takeout chopsticks cut to
very specific lengths so it could nestle
right up against this turret
oh i'm lost computer show me my build
progress cool we've done some turrets
and these two buildings keep an eye out
for this throughout the video so you
don't fall too deeply into the unending
void of details
now let's go get lost over here
i was very excited to find these
nostalgic beauties at a secondhand store
the other day these will add some nice
roof variety but i also think fish scale
shingles give a nice cozy ghibli vibe
they also give a nice ghibli vibe
next for this little platform down here
that i barely noticed at all i'm using a
plastic lid as a base tailored to size
with some plastic snip so that it can
fit the castle's oblong booty
after a layer of bricks and a layer of
modeling paste i wanted to add a floor
and underside using air dry clay and i
remember there was a comment a while
back that mentioned adding pva glue to
the clay to prevent it from cracking and
after a very sloppy application it
worked kind of okay though it did make
it way harder to sculpt i let it dry a
little bit then just decided to glue it
in place and let it do the rest of the
drying on the castle
hey what do you think the function of
these curved pipes are they kind of look
like human ears to me so that's what
they are and that's music to my ears
[Music]
i'm outside now because i needed an
extended plastic melting session the
wind calcifer only obeys master how we
took a bit of patience but the wind
frustration definitely beats indoor lung
damage i also have some of these
interlocking pipe toys which i ruined
with fire in such a way that i could
glue saxophones and pipes together into
something vaguely ear shaped with a
little bit of epoxy green stuff i made
it look like it's been repaired and
patched up with metal plates this has
the added benefit of hiding actual seams
as well
alright ears done who's ready for tongue
the tongue looks like it's made out of
overlapping metal plates i think this
milk bottle should be a good starting
point i prepped the bottle by cutting
out all the rings at their deepest
indent to use as the tongue rings but i
can't remember what this thing is it's
on the tip of my tongue
oh saxophone i'm using this segment here
as the tip of the tongue which i'm
gluing to some roughly carved foam to
use as the tongue bones basically just a
structure to hold the plastic rings then
i'm sliding my way up the tongue with
larger and larger rings that get wrapped
and secured with hot glue 200 rivets
later most of which will be hidden deep
in the throat and the tongue's done
and hey as long as we're working on
details you might not ever see let's
fill out the mouth with a bunch of wood
and bricks
for the mouth floor and pallet we're
going to pop into some prangles and as
they say the once you pop the fun just
continues for an indeterminate amount of
time
if you don't have prangles just gluing a
bunch of broken coffee stirring sticks
to paper board works too this was a lot
easier than trying to glue the sticks
directly into the mouth but i'm going to
tell you right now that i really regret
not painting it before gluing it in
there and the back of the mouth is air
dry clay that i rolled over with a brick
texture roller that also will be a
nuisance to paint
continuing with the list of face details
we're going to tackle the nose next
which is one of the more iconic details
in my mind
i've already started harvesting this
gundam for this project so why not
borrow its back skirt which is already a
beautifully detailed five-sided polygon
i drilled out a couple nostrils
making sure to tear up the plastic along
the way then accented each nostril with
a delicate slice of this shampoo pump
bottle tube after rivets and a couple
more gun plot pieces it's a nice little
pig nose
the game plan here is to cover up all
this paper board with plastic kicking it
off with this piece from that plastic
apple container which is really just
some base structure to help mount the
nose to
for the eye sockets i'm using two of
these dimple pieces from the apple
container then adding on a couple
plastic tile spacers but just the ring
section
this will add some strength but it's
also a new convenient place to add
rivets
and i almost goofed and put the eyes up
here before realizing nope they go here
for the corners of the castle lips i
glued a bunch of coffee stirrers to a
piece of paper board hot glued them in
place then got ready to make those
kissable lips
[Music]
the curved ridge on the bottom of this
thick plastic salsa container should
provide some structural stability to the
bottom lip one technique i did
occasionally was to cut tiny windows
into the plastic so i could hide details
behind it such as this gundam fist
punching out of the hole to add some
subtle detailing
everything was made nice and rough with
a good sanding so each piece held strong
with just a bit of ca glue
and then for the chin that is mostly
obscured on the underside of the mouth i
used another one of those apple
container domes to round out the whole
thing
okay do not emulate this next technique
for cutting plastic i don't know why i
thought scissors would get through this
but i'm very lucky the blades didn't
slip
a hobby saw or plastic clippers would
have been the superior choice
for pretty much all the lip pieces on
the upper mouth go fetch these extremely
niche and specific gundam parts that
you're keeping under your desk or follow
the more accessible option and use
random junk plastic cut to the right
size just like i did for the bottom jaw
hmm i don't know what this is do you
please let me know if you do i found it
recently at a thrift store where i've
been trying a new technique of crouch
walking to find hidden crafting finds
they're usually down here
you should try it there tends to be lots
of broken stuff at the backs of shelves
especially in the toy section that a
cashier would likely be happy to get rid
of just make sure to ask nicely when i
do this foraging technique i try to
always buy something so i'm not just a
scavenging goblin i'm a customer and a
scavenging goblin any red piece you see
is from that gunpla kit i threw up on
the screen a minute ago except not this
slightly off-red maroon piece this
gundam groin belongs to this guy
a couple more bedazzled gundam pieces
here
this is a plastic piece to use for the
eyebrow area i tried to use the curve of
the bottle to my advantage
remember you can never have too much
deck so put a bit here followed by the
bell nozzle of a gun plot kit
next continue dismembering gundams and
take this ankle for the corner of the
mouth here
this is the hot sauce limiter that big
salsa puts on the end of their hot sauce
bottles
after a couple gear charms and some
rhinestone rivets it makes a fairly
convincing rotation point for the jaw
here speaking of the jaw i added some
broken coffee stirrers to make the mouth
a bit more dilapidated
mayonnaise squirt bottle
i need my face aesthetically pleasing
and perfectly proportioned so this was
definitely the hardest part of the build
ninety percent of the progress i made
while crafting was just four dimensional
chess in the void of my mind i spent
most of my time just staring at garbage
and trying to figure out how this
non-existent model kit was going to go
together whenever i got to cut and glue
a piece together it felt like a triumph
oh what a pretty fire
seriously i couldn't have made this
build without cleaning everything i
could from scratch bashing he has true
junk vision and is so good at unifying
garbage into something beautiful
and with that we've reached full face
all right face done time to deliver howl
his hot bath water with this boilerpot
over here
we won't need fire
we'll need this fire hydrants toy
i'm slicing off its two arms and
combining it with the cap from a bottle
of ramune to create the chamber and for
the pipes that deliver the steam or the
magic sauce the castle runs on i'm using
a couple of these 90 degree bends from a
set of pipe toys
throw on a couple more mysterious gundam
pieces from the bit box and it's done
eventually this piece is going to go
right here but forget about it for now
because we need to make another one on
the other side starting with a broken
piece of a recorder i found at a thrift
store
coupled with tank wheels pipes and
rivets this one is done too
may all your baths be scalding hot
next we're going to make the little
tacits that protect the castle's chicken
legs
for the general shape crack open a ripe
ping-pong ball
and harvest several of the wedges gluing
one on each of the hips
and then for the scales or tacits get
ready to make a mess with some yogurt
gotcha
i like the plastic that these containers
are made of because they're very
flexible and easy to work with
these plastic scales make a lovely nail
manicure but for today we just need to
throw some rhinestones on them and then
glue down two layers of scales onto the
hips
and then a strip of craft foam to hide
the mess
what about this very minor gear
component that doesn't really matter
it's part of a shampoo pump bottle metal
gear charm part of a plastic tank model
a bead cap and then it's done
quick progress check
next we're going to build all of the
various room attachments that hang off
the side of the castle a lot of these
employ very similar techniques and
they're pretty basic so i'll do a very
cursory explanation of each one this
building will be nestled under the pipe
so i filleted off a bit of foam in order
to squeeze it into its perfect cozy spot
that actually goes for all of the
buildings they're all made of foam
specifically for ease of slicing and
fitting for the windows some
cross-stitched canvas has window panes
and we'll call it good
and here's another building that looks
almost exactly the same as the last one
except for the key feature of how the
foundation of this one is tailored to
fit around the curve of a pipe
there is nothing unique to tell you
about this little only shack down here
but i thought i should show it to you
just so you know they're not forgotten
that last building was nothing compared
to this absolute show stopper up here
the biggest thing i learned on this one
compared to the last few buildings was
how cross stitch canvas windows look
much better if you wedge them into cut
out foam holes
this building is also a fancy twofer it
wraps around a turret with a wood shack
on one side
this next little crumb of a building
serves no purpose other than to fill the
armpit of the castle here you sound so
sinister
good
[Music]
all right that should be all the
buildings on the left side how's the
progress looking
nice uh oh i think i missed someone
there's one more little guy hiding up
here behind this turret
i made this platform to give the house a
little bit of elevation covered a foam
block in wood siding and then topped it
off with a chimney made from a shampoo
pump bottle
for this thing which is what i assumed
to be one of the castle's numerous
open-air sewer vents i used this very
ribbed portion of a cap from a printer
ink refill bottle nestled it into this
piece from a plastic apple container
then topped it off with a bead cap so
the pollution can vent out
if you have any extra saxophones just
use them as miscellaneous pipe detail
wherever
we'll attach it later after painting
let's continue moving along to the back
with more plastic filler such as more
gundam kit pieces and another boiler
chamber pipe combo made from the
mouthpiece of a broken recorder more
pieces from a fire hydrant toy and
anything else tubular this pipe glob
will ultimately rest between the
castle's webbed flipper wing things
which we're making right now
these beautiful butterfly wings look
like the webbing is made out of mini
overlapping metal plates held between
five segmented fingers we'll start with
the webbing i've been saving a lot of
these takeout containers because i
really like the ridge details on the
sides i cut and sanded a bunch of pieces
like this and after lining them up these
boneless wings are almost ready to take
flight but i prefer my wings bone in
with an armature wire skeleton hot glued
at the joints
i'm actually impressed with how sturdy
these feel
butterfly i recently learned from miss
cass about the powerful combo of green
stuff and milliput using a one-to-one
ratio of each it creates new and
improved light green stuff that's easier
to sculpt than green stuff alone yet
slightly more flexible than milliput on
its own i thought the working time was
supposed to be almost 2 hours but i had
maybe 30 minutes tops before it started
to harden up so i had to go quick
hurry up please i made some faux rivets
using the end of a plastic tube then
covered the webbing in more pieces of
that takeout container to add a plating
effect
to connect the wings to the castle i
need something to mount it to
the tips of these tube toys happen to be
the perfect diameter to fit the finger
segments of each wing i used a lot of ca
glue and accelerant to create a strong
weld for each tube then i should be able
to insert these wings into place after
painting is done
[Music]
i think there's some sort of illusion
spell that keeps adding more houses on
this shot every time i look at it
from this broken star wars speeder tank
i'm using the windshield frame to mount
a nice deck
on top of this deck goes an improvised
house made out of foam since this
building's on the back of the castle i
thought maybe this can be the bathroom
but as you know it's the new wizard law
that witches and wizards don't use
toilets so this can be sophie's toilet
and here's a sewer pipe coming out the
top
next let's get our hands on this thing
dangling between the legs which is the
door where sophie first enters this also
includes the rest of the junk that hangs
off the back
i found one of these kids echo
microphones at a thrift store
sometimes i ponder the moral dubiousness
of an adult depriving children of
potential toys just so i can take them
home to break them for crafting these
pieces kind of look like an industrial
vent to me
i mounted them on a piece of chipboard
to match the width of the castle and
then added a little maintenance door for
this section now time to fill out this
deck with a bunch of sticks
the texture on coffee stir sticks is a
bit too smooth on its own so i taped a
bunch to a box and roughed them up a bit
i filled in this section with a piece of
yogurt container plastic then here's the
thing i found on the ground and i have
no idea what it is kind of looks like a
metal beam so i'll add it right here i
drilled some holes for inserting some
osha approved railing even though hal's
fines are innumerable then i pre-glued
some stirring sticks to a piece of paper
board for a top deck
and here's a cute little stairway isn't
that wonderful
i accidentally extended the door past
the top of the deck so i'm adding some
foam and plastic to help transition
between the height differences
then i added a bunch of bricks to help
transition it to the rest of the castle
but it's missing something
every build is incomplete until it has a
horseshoe charm somewhere quick fit test
under the wing zone and this door
section is done but it's not the door
section you might have been thinking
[Applause]
i carved the main shape out of foam and
added bricks off camera ultimately this
dongle will hang down right here after
some modeling paste for brick texture
the main defining feature is the metal
scales that cover the top and the bottom
[Music]
the door is pieces of coffee stirring
sticks a tiny armature wire door handle
paper board hinges and a few rhinestone
rivets
now back to the castle because i almost
forgot to pay attention to the belly the
underside is covered in a frightening
amount of details but we can take
shortcuts because it's barely seen
from a salsa container i used earlier i
added a few rivets and that should be
decent enough to cover the majority of
the real estate then i had this tank
tread which makes a nice collar
occasionally i would place some of the
buildings in their place to make sure
they would be crowded in junk details to
hide the seams when i glue them in later
i didn't reference the movie too much
but instead decided to just improvise
with whatever junk i had on hand like
this leg which had a nice vent that fit
perfectly right here and then i used a
broken bubble wand to fill the rest of
this gap
this shot's just for the gunpla fan so
they can keep seeing me desecrate the
master gundam you can never have enough
exhaust pipes the castle is covered in
tubes leaking goop so i added tubes
wherever there was space
if one of your tubes is emblazoned with
the insignia of the rebel alliance just
put a bead over it and call it good now
hold this in your mind for a second
while we fill in some more gaps over
here with plates and rivets
okay good now put it there
nice
this was part of a noisemaker party
favor that this building will mount to
then the rest of the gaps are train
wheels and zip ties because i can get
away with whatever recognizable junk i
want to
more riveted metal panels but for this
next section let's throw down a row of
wood boards around the neck
someone tweeted this movie poster at me
and i noticed there's this little pimple
under the chin that i forgot this little
wood shack will go right here but i need
to camouflage it with some miscellaneous
junk pizza time
these miniature tables that come with
pizza have three free tubes that can be
heat warped into whatever shape you need
next with this thing we're going to this
build to the other side let's fill this
gap with some bricks
and maybe a tiny turret looking out for
any attacks coming from the underbelly
as i was filling out this section with
more junk plastic plating i ran out of
super glue but then i figured heck why
not just use the cap as another exhaust
pipe but all those tiny belly tubes
barely count as exhaust pipes those are
exhaust pipes
this fire hose squirt gun is already
pretty close to chimney shape i gave it
more of a whimsical shape by adding the
bell from a broken recorder and replaced
the trigger with more pipes because why
not
with a second squirt gun i embellished
the top with a deodorant twist knob part
of a water filter a couple pieces of
plastic pipe then mounted the whole
thing into the inner part of a plastic
spray bottle
the rule of threes means we need one
more large smokestack which i happen to
find in the form of a children's
telescope during some junk foraging in
the wild
this one's pretty much good to go
[Music]
i mixed up another epoxy putty batch of
green stuff and milliput and added
various plates and patches all over the
smokestacks to give them a more
ramshackled appearance
for the eyes or maybe their snail
tentacles this star wars speeder has an
engine on the back that is secretly an
eyeball tube
i like the design of this piece because
it means i don't have to make it from
scratch it gets us about 90 of the way
there the only addition i made was an
eyelid from a tofu container the eyes
are asymmetrical so the second will be
conjured from this junk and maybe a bead
i stole from bill
but the crown jewel is the grinder from
a salt and pepper grinder
then i just arranged the chunks of junk
in a way that looked most aesthetically
pleasing to me and glued them each
together
then to make all those random pieces
more cohesive i added a cable made out
of a hair band which is a little trick i
picked up from scratch bashing and with
that the face is complete
we're almost there just a little more
junk pile left to go
oh no
okay listen i know we already built 100
redundant houses but great news
there's more
but these ones are the most interesting
ones and that's not sarcasm i'm
temporarily placing the chimneys where
they're gonna go so i can see how much
space we're working with here three
point four by two point three three
three three three inches write that down
the foundation of this building is in a
regular hexagon covered in wood siding
sadly this structure is almost
completely obscured in the final build
and only serves as a platform to elevate
the next two stories
the underside of this building almost
certainly doesn't need this many wood
supports because they'll be invisible
but i just can't help myself at this
point i made the next floor to overlap
the roof with a little bit of
nonsensical overhang again wizard
aesthetic
and it just wouldn't be wizard aesthetic
without a spindly tower covered in
stones jutting out from the side
somewhere at the top of the tower goes a
circular penthouse with a classic
conical wizard roof
and then to make these plain walls a
little bit cooler ranch i carved in a
few areas where the siding has broken
away to reveal the bricks underneath
chimney
shingles
and then sneaky boards to cover up the
seams in my phone
then a little bit of modeling paste for
stucco texture and we'll call this one
done
for the last little unassuming wood
shack up here i started with a chunk of
foam with a notch cut out to that foam
goes a very shallow barely steepled roof
then a couple windows
but then i realized that this building
is missing something you can see it
right here
and here so i made a coffee stirring
stick cross because this building is in
fact a church i wasn't aware that howell
is religious but in the english dub of
the movie howl is actually christian
now that i know this is a church this
makes what i was going to place right
here seem like a wild choice in this
nook i'm adding a chain and a hook the
pre-made orange beam was from a micro
machine toy then i added a couple gears
and jewelry chain to it
i probably should have glued the hook to
the chain first but this is more fun
[Music]
nice catch
the castle is covered in nonsensical
chain gear garbage like this and as long
as we've built this one let's build
another one that gets a whopping 10
frames of screen time
[Music]
the starting point is this wishbone from
a classic set of micro machines
[Applause]
i glued the two tips together and then
added a couple gears and the threaded
rod from a deodorant stick
this geared catwalk is going to connect
to yet another building that will sit
behind the wings on the back
not much interesting to report about
this one it's more foam and coffee
stirring sticks except i did have this
very cute little trap door that comes
off the roof here
hey kind of interesting thing i learned
is that everything's made up and the
details don't matter in fact the castle
details change between almost every shot
in the movie which means if i tell you
this corrugated metal shanty exists in
the film you legally have to believe me
i added a lift arm with part of a spray
bottle but we need to eliminate this
chain wobble
and now we have a nice little chain
popsicle
off the back of the castle there's a
very inadequate propeller though i
prefer the flight version from the end
of the movie so i'm going to combine the
two concepts just a bit
i have this pre-made propeller from a
micro machines toy but it needs a little
extra beef to be a more appropriate
scale for the castle
i glued on these angled wedges to a
bunch of coffee stirring sticks and
that's looking much more powerful
we've saved the highest and lowest parts
of the castle for last at the very top
of the castle there's a crow's nest and
some catwalks the main part of the nest
will be this plastic toy bucket which
will sit atop this very stiff bubble tea
straw here's a random toy beam i found
at the thrift store which fit on the
straw with a little bit of off-screen
drilling i truncated the beam and added
a few catwalk details such as this cross
stitch canvas as metal grating and a
safety rail but we need a way to scale
this junk so i made a ladder out of this
mesh insert from the mouth of a plastic
jar
as a little more visual noise here's a
scratch-built propeller and a random
spout
for the crow's nest itself i cut off the
top to make it a little more squat and
capped it off with a roof made from this
dome lid of unknown origin
i found this on the ground at a place
where sports happen and i have no idea
what it is
i'm using just this part as a hat for
the crow's nest and here's a chimney
after adding some chains and rivets off
camera the crow's nest is done and that
means it's leg day
the castle needs to have stupid strong
stumps to hold up everything so i'm
using two pairs of metal curtain rod
brackets they squeeze right into the hip
sockets have a built-in knee to mount
everything and are extremely sturdy
but if this thing falls apart once it
stands up i'm probably gonna scream
we need strong lower legs too
that hurt my hand so that means this is
strong enough
to beef up these thin bones i'm going to
make some classic bill making stuff bead
bot legs
to start make sure you accidentally glue
your legs to your table surface
and then remember that this is what
parchment paper is for
i strengthened the knee joints with more
beads and lots of ca glue and accelerant
and lastly these chicken feet need some
talons
after gluing in the toes i feel pretty
happy with how these feet turned out but
they're actually the second set i made i
had a grand vision for zero dollar
garbage feet made from dog poopy bag
cardboard tubes and a bunch of leftover
plastic palm trees but the end result
looked way too thick and had to go
and there they are at the full load of
all the parts ready to be painted oh
wait papa needs his checkbox
[Music]
i kept all the pieces separate to make
them easier to paint and to make the
final assembly more of an exciting
reveal so take one last look at this
hideous hodgepodge of colors
i'm priming everything in flat black and
then also flat black because i'm
probably going to run out at some point
then i hit everything with a grey
xenothel highlight to make these primer
shots more interesting to look at
[Music]
everyone loves a good coat of primer
so glad it's not a disaster now let's
grab a brush and start slapping some
colors all over everything yeah slap it
on
i'm going to use cheap generic craft
paints mostly but for the metallic
paints i need something with more actual
metal flake in it wait what are you
doing
[Music]
there's a lot to paint but my plan for
going fast is painting one color at a
time starting with everything that is
made out of wood
sorry if this edit is confusing we're
going to jump between sections
constantly but dividing it by material
made the most sense in my head plus it
meant not having to wash my brushes as
often which is a thing i do not like to
do the main wood strat is a be sloppy
because we can clean up later with the
other colors and b over brush without
getting too deep in the crack so we can
retain the dark recesses as shadow
this first pass is translucent but i
don't care because the lighter browns to
follow will hide this cursory paint job
this is where i learned the importance
of brushing those hard to reach molars
for the inside of the mouth i was less
concerned with doing a good job as i was
with doing a paint job just get that
brush in there and wiggle it around
until everything has paint on it now
that it's all base coated we'll take a
lighter brown just to hit the edges with
a dry brush
if you have to choose between good fast
or cheap when it comes to dry brushing
use a makeup brush so you can choose all
three it does a decent job knocks out
everything very quickly and requires
very little thinking only wiggling a
brush next we're going to tackle all the
house siding which is all cream colored
we're going for a stucco appearance with
this color i don't remember the specific
name of this shade though do you that's
bone oh right bone it took about three
coats of creamy bone to cover up the
primer but you can use any shade of
almost white that you have on hand look
at that subtle off-white coloring
a tasteful thickness of it
how old you're gonna make me blush
you're so supportive of my painting
[Music]
[Music]
okay that's all we're done with the
cream sections now i've learned my
lesson with yellow and base coated this
building in orange first to help the
yellow coat feel warmer in the recesses
i dry brushed the edges in silver
painted the deck and trimmed off a piece
of my painted fabric for the canopy i
super glued on some armature wire but
we'll assemble it at the end so forget
about it for now
next we're going to focus on the roofs
roofs there are many
for most of the roofs with shingles i
stippled on a dark red followed by a
coral dry brush to subtly highlight the
edges
but for some rubes you got a terracotta
especially the corrugated paper roofs to
help imply that they are made out of
clay tiles
and why not throw in a nice purple roof
too just for cuteness because it feels
appropriate for these fish scale
shingles with a lovely light lilac dry
brush oh quick thing about windows real
quick
after painting the panes of this tall
boy i finished off the grills with a
piece of green paper board so i could
just glue the pieces on rather than
having to delicately avoid painting the
windows
i believe i gleaned that smart order of
operations from a mechanical fiend video
then i gave each pane a light green
highlight to help them pop a bit
[Music]
for the bricks i'm unifying everything
with a quick and sloppy first pass in a
grayish red that i mixed up then i
picked out the chosen bricks and added a
little variety with a family of similar
colors red
gray
and some tan
and i applied the same color scheme to
the bricks on all the house attachments
too the colors are a bit too vibrant so
i'm muting everything down and blending
them together with a nice warm gray that
felt like it could play nicely with all
of the colors
next for the material i've been afraid
to meddle with
after priming everything the metal
plating was looking pretty decent but i
noticed a few gaps in the armor so we're
filling the gaps with a sludge of brown
paint and baking soda to hide the holes
and add some rust texture
like this deep crevasse that you could
fall into
i tried to focus the goop on just the
gaps but was inevitably very messy so i
blended it out a bit for a more natural
look which i have decided was my
intention all along
and don't forget to rust up that
underbelly
adding to that basic brown let's dab on
a little terracotta to add some depth to
the color
now for the non-rust shades starting
with old brass which i dry brushed over
the legs to retain the dark primer in
the deeper recesses
for the wings i wanted them to have a
two-tone effect a stippled copper over
all of the wing membranes then a
dry-brushed gold on all the wing fingers
then i added some wear and tear with a
dry brushed silver
speaking of silver dry brushing just
keep doing it make those turret domes so
dry and so silver i felt a bit bad about
how dry i was making the brush so i
rewarded it with a quick exfoliating spa
then after a thorough drying it's back
to more dry brushing primarily bouncing
back and forth between copper silver and
maybe the occasional bronze for the rest
of the castle but why dry brushing in my
mind the finish of the castle is very
worn and aged it's a neglected antique
which dry brushing helps emphasize by
retaining the dark primer in cracks and
around rivets
this is not a factory fresh castle this
is a beast constantly buffed by the
elements
the result is some decent color
gradation across each surface almost
giving it a pre-shading effect around
each panel without having to use an
airbrush
we're just about finished painting this
tetanus inducing smorgasbord which will
bring us to the final step to finally
tie everything together
weathering we'll start by making a few
homemade washes but this time it's
dangerous
we're going full respirator because
mineral spirits are poisonous please
wear a mask or go outside because the
side effects of rooting and stuffing
just aren't working
i've completely converted to oil washes
and can never go back ladies and
gentlemen if i say i'm an oil man you
will agree
[Music]
i wish i could tell you the perfect
proportion of mineral spirits to oil
paint but it doesn't exist like
water-based washes i used a paper towel
to dab off the extra before it pooled
and dried and here's a little flavor
taste for how the wash looks about 15
minutes later
i love how rich these are looking i feel
like i'm cheating
working with these washes does require
more prep and cleanup but i think the
results are worth it provided you have
ways to avoid breathing in poison
i'm doing several passes of different
colored washes but everything is first
bathed in burnt umber to start with the
unified base weathering contrary to the
belief in my brain the castle is not
fifty shades of brown but many vibrant
hues of red green and blue splotched
everywhere i'm going to add more
colorful washes later but for now please
enjoy these four peaceful minutes of
assembly without me talking over it
[Music]
[Music]
[Music]
[Music]
[Music]
am i enough yet father
not yet my child there's always room for
flocking
i'm mixing up a moss paste using glue
and fine green turf but don't toss this
pesto on your pasta just yet it's not
for your mouth it's for this mouth
i'm adding a few streams dripping and
growing down the lips because the castle
practices terrible oral care i'm also
using this pureed spinach as a gap
filler around any buildings or anywhere
that moisture might accumulate like at
the drippy tips of every exhaust pipe
it's an all-purpose goop maybe it's
pollution maybe it's algae maybe it's
moss maybe it's grass stains from the
castle getting too rambunctious when
it's romping in the alps
flocking is my favorite and i just kept
adding more until it was no longer movie
accurate
[Music]
as promised it needs a little more color
by way of oil washes
[Music]
we've reached the end my friends thank
you deeply for your patience as this
project stretched thrice as long as
expected special thanks to everyone on
patreon for their support and another
special thanks to demon gummies for
lending me this lo-fi music track
stick around for the rest of their song
and 185 patreon name shout outs thanks
for watching and let's roll the beauty
shots
and nico michaela murray dungeon
masterpiece nick custello christopher
smith bobriella starboard emmy coona
briench legal milch happy birthday ellie
emma kuck
danny cara pettin poet fox karkichu
ginny jennifer galleon she was lost
random noob henry cats caleb crone
caroline steve cardinale carmen b aaron
g ng katie julie bradley's majesty king
antonius ii cassian david snowder
dominique baggett grayson 107 reagan
kate foster danny ducker brandon bell
case era syrah
karen milgren the cow actually amba
libby arnold leo mary sabby proctor
carous kelsey lynn bramble eric morrison
junior buzzy beaneck bowie sarah jameson
ryan bateman randall young mcsquirrel
kai monatois on leslie young mazaya
strazy
[Music]
jessica baked haunted clay heather angle
on a haze leafy green boy titty coffee
flop and love akila connie lia army with
love
azure star amelia red eye jedi no goshi
lunar magi mochi jinx the dings jesus
zamora josephine liu and laura katie
ocean bradley harder scott grossman jake
harker katie pott madley merc gia
ferrugia andrea wilkins justin wilbanks
hailey jonas sarah
sophie claire blaze lewis 4 mitchell
mares and benoit deutsch lucy ball
stephanie gusman justin shields marisha
goodman maxine delcor sebastian and
michaela calhoun dan peach issa's org
carrie friesen florian brewel derpy
washy wizard slithering snake amber eve
sebastian lafaye artsy geeky merrick
mingo nades doggiest josh hanno brianna
diega garcia halcyon hyacinth jackie f
nathaniel spurrier honey russ clint
thunder aaron said thomas acm jamie
jamie jams casey van jammi media inbar
myerson travis paul henderson 93 rin wtf
dylan carroll dylan wright laurel deal
ally mcknight adrian knight mr morrell
brett forsyth deborah lavelle
letterpress soap studio blueprints
workshop a simone breon peterson henry
bieberman linda wilson grist gina griez
co-mingled shipwrecked mecca tiffany
hoyle lauren kelly j.s red scott frost
sasquatch and greg's soul harmony dasha
james croots jade north flock utatra
luke gambell d sports junior annalise
pep rock anthony was here johnny boy
kayla littlefield jenna hill cyril and
sarah cropley hannah robinson musical
blind dana mccarthy catherine scatson
stephanie walker corey newton daniel
rucker tango wild 8 8 and kendall yates
[Music]
you