The definitive Guide to Zerotier VPN and why it is "better" than Wireguard (Tutorial)
Published June 2, 2023, 9:20 p.m. by Monica Louis
Today, we will strike back! Not with a commercial of NordVPN or similar. No, the VPN we will build is free of charge! And it can be built by everybody in minutes. Very different from Wireguard, which is
complicated. Sounds like a deal? In addition, you will learn a lot about the internet.
My second channel: https://www.youtube.com/HB9BLAWireless
Links:
Raspberry Pi 4: https://amzn.to/3nlHfvc
Cheap Proxmox server: https://ebay.us/h7WmoB
Proxmox Mini PC: https://s.click.aliexpress.com/e/_DnL8Fxb
IOTstack Zerotier Wiki: https://sensorsiot.github.io/IOTstack/Containers/ZeroTier/
Proxmox Video: https://youtu.be/rXc_zGRYhLo
IOTstack Video: https://youtu.be/a6mjt8tWUws
Remote Station video: https://youtu.be/Rgd5WTGdwZ8
Zerotier Wiki Article: https://bit.ly/3JWXyGm
RUTX14: 4G RUTX14:: https://teltonika-networks.com/products/routers/rutx14?utm_source=youtube&utm_medium=referral&utm_campaign=teltonika-networks-rutx14-layer-2-bridge-over-zerotier&utm_content=video
Patreon supporter companies:
https://passiv-energie.gmbh/
https://www.welectron.com/
https://yosmart.com/
YouTuber Patreon: https://www.youtube.com/@MakersMashup/
The links above usually are affiliate links that support the channel (at no additional cost to you).
Supporting Material and Blog Page: http://www.sensorsiot.org
GitHub: https://www.github.com/sensorsiot
My Patreon Page: https://www.patreon.com/AndreasSpiess
Discord: https://discord.gg/JfgDSa8
If you want to support the channel, please use the links below to start your shopping. No additional charges for you, but I get a commission on your purchases to buy new stuff for the channel
My Amazon.com shop: https://www.amazon.com/shop/andreasspiess
For Banggood https://bit.ly/2jAQEf4
For AliExpress: bit.ly/3MtXUY8 (just go on from here to your product)
For Amazon.de: http://amzn.to/2r0ZCYI
For Amazon UK: http://amzn.to/2mxBaJf
For ebay.com: http://ebay.to/2DuYXBp
https://www.facebook.com/profile.php?id=100013947273409
https://twitter.com/spiessa
https://www.instructables.com/member/Andreas%20Spiess/
Please do not try to email me. This communication channel is reserved for my primary job
As an Amazon Associate, I earn from qualifying purchases
#no#midroll#ads
You may also like to read about:
Today, we will strike back! Not with a commercial of NordVPN or similar. No,
the VPN we will build is free of charge! And it can be built by everybody in minutes.
Very different from Wireguard, which is complicated. Sounds like a deal?
In addition, you will learn a lot about the internet. So let’s start.
Grüezi YouTubers. Here is the guy with the Swiss accent. With a new episode and fresh ideas around
sensors and microcontrollers. Remember: If you subscribe, you will always sit in the first row.
In this video, we will: - See why we often do not need a paid VPN service
- Quickly review how we had to create secure access to our home using Wireguard or OpenVPN,
the darlings of past times - Discover new services
promising to change everything - Try to understand how they work
- Implement such a new service to access our Home Assistant server or our home PC
- If you want, you can learn how to connect to your whole home network
Because I am not a networking guy, I will simplify things with the risk
of not being precise or even wrong. I am sure you will correct me in the comments.
What are the different ways to securely access our home servers?
- VPN services like NordVPN. They operate a global network and route our traffic through
their infrastructure. So we depend on the performance and latency of their network
- VPN software like OpenVPN or Wireguard use the public network.
To protect our data, they encrypt it - A new class of services and software
that create a virtual private network on top of the public internet. You see,
they cleverly combined the two above methods I do not cover VPN services. Most of us do not
need them. Their main advantage is that we can “fake” our location and
watch Netflix with a US location, for example. Currently, Wireguard is the “go-to” solution if
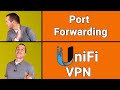
you want to avoid VPN services. But why did I say creating such a VPN is complicated?
Let’s see what we must do to connect our Smartphone to our home PC using Wireguard.
And why can it create security issues? With the currently used IP V4, not enough
addresses are available for all the devices on earth. This is why clever guys a long time ago
invented a method called “Network Address Translation” or NAT that resides on our
routers between the “real” internet and our home network. It becomes evident if we look at our IP
addresses like 192.168.0.xx or 192.168.1.xx: We all have the same addresses! How can the internet
distinguish that a message is for my PC and not for yours when they have the same address?
It would be easy if we would extend the address range with, let’s say, five digits. Then we would
have much more addresses, and the problem would be solved. This is precisely what IP V6 does,
BTW. Unfortunately, it is still not implemented in most of our homes.
The clever guys mentioned before created another method to add a few digits to the
address and called them “ports.” We will later see how this works.
Because there are not enough, IP addresses are expensive.
So, our service providers do not buy too many of them. This means that they can
change our home IP address without notice if we do not pay for a fixed address.
These two “hacks” work well, even without enough addresses. But as
with all hacks, they have some disadvantages. Let’s look at a typical example: We want to access
our home PC from our Smartphone at a restaurant. If our Smartphone knew the IP address of our home
PC, it could call it and get an answer. But as we saw before, our home IP can change without
notice. And the internal address behind our firewall is not known to the internet. So we
need a first hack: A so-called dynDNS service. Our Smartphone can reach this service on a fixed
IP address. A small piece of software installed on one of our computers in our home network calls
the DynDNS service occasionally to tell it the current home IP. So, the DynDNS can route our
message from our Smartphone to our home IP even if it changes. The first problem is solved.
What is the second problem? We have a ton of different devices in our home network. How
does the Smartphone know that we want to call Home Assistant? Easy: Home Assistant uses port
number 8123, for example. Now we can close the gap between our internet connector and the HA server:
We tell our firewall to “Port Forward” port 8123 to the IP address of our HA server.
So, all messages from the internet with port 8123 are automatically sent to our HA server. This is
why port 8123 is “open.” Unfortunately, also to all other not-so-nice people scanning all internet
addresses to find such open ports. A significant security issue for non-IT-experts. And, of course,
we cannot have two Home Assistant installations with the same port in our home network.
Let’s now follow the answer packets of our HA server to the Smartphone.
It contains all information about the route back to our Smartphone.
So the package quickly finds its way back.
From now on, the way or “route” is open, and we no more need the service of the dynDNS.
This was only one part of the problem. Because we do not want that everybody can read our
love letters, or even worse for a Swiss, my bank account, we have to encrypt all traffic
across the internet. Today, this is done using cryptography with two corresponding keys. One is
called “public,” and the other “private.” So our Smartphone, as well as our server, have to have
cryptographic software and know the respective keys. Wireguard and OpenVPN do this job. That
is why we have to install such software on both sides. In addition, we have to securely transfer
the key from the server to our Smartphone. And to all other Smartphones if they need access.
Fortunately, with Wireguard, this can be done using a QR code. Now we are ready to rumble.
To summarize, we had to: - Create a DynDNS service
to get a “fixed” IP address - Open ports in our firewall,
which is complicated and dangerous - Install Wireguard or OpenVPN on the server
- Install the same thing on the Smartphones - Do some QR-code acrobatics or distribute
the key otherwise And there is more:
As I showed in this video on my second channel, this system does not work if a cellular connection
connects your home network because the mobile carriers use “Carrier Grade” NAT.
Unfortunately, you can not open its ports at your discretion, and your connection will not work.
Fortunately, there is a much simpler way: If our home server calls an internet service like Google,
everything works flawlessly. A temporary port is automatically assigned, and the packet finds
its route because Google has a fixed IP address (or fixed IP address). As before, the way back
is no problem. So, if connections are initiated from behind the firewall, they work flawlessly.
This was the initial goal of NAT, BTW. And this is precisely what this new class
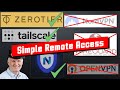
of services does. Their names are Tailscale, Nebula, Cloudflare, or Zerotier, and they work
on a higher level than Wireguard and OpenVPN. Tailscale even uses Wireguard for encryption.
In this video, I use Zerotier to show how it works. Maybe you comment if you think
my choice was not appropriate. And one remark before we start:
Zerotier is open source. And you can host its server if you do not trust the company. Very
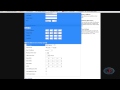
different from VPN service providers. Let’s create our first virtual network
and call it “homeNet.” Members of this network should be our Home Assistant server,
my home PC, my Smartphone, and my laptop. We go to Zerotier, create a free account,
create our first network, copy its ID to a safe place, and select one of these address ranges.
You decide which one you like most. And our network will be private, of course.
But how can we add our devices? This is easy. Do you remember what we learned before?
If we initiate a connection from behind our firewall, everything runs as if by magic.
So we must install a program on all computers that call the Zerotier server. Let’s start with
the PC. We install and run the Zerotier client for Windows and connect with the network ID from
before. No key is needed. Now the PC calls the Zerotier server. With this call, Zerotier knows
precisely how to reach our PC to send its answer. The connection is also encrypted.
The same goes for the Home Assistant server, where we can add Zerotier as
an add-on—everything without opening ports and without a dynDNS service.
The same goes for Smartphones. There we install the Zerotier app and connect them to our network.
When the devices call Zerotier, they appear in our dashboard and create our virtual network.
Is this enough? No, of course not. Because we want to keep our network private, we have to accept
each device before it can join. After joining, it gets an IP address of our selected range.
One thing is essential: All devices stay connected to the internet as before,
Zerotier just adds a new network adapter in parallel. Very different from a VPN service where
all traffic is routed through their network. But this is just the beginning! In this stage, the
Zerotier server could relay all messages between the different nodes in our network, like the VPN
services. But this would be so retro and slow! And because it would use Zerotier’s infrastructure,
the service would be expensive. Not what we want. These clever Zerotier guys came up with
a much better idea: They distribute the collected information to the different nodes to enable them
to connect directly. With two advantages: 1. The direct connection has low
latency (ping time), is performing, and fast 2. Zerotier only needs resources at the
beginning of the connection. This is why they can use a “freemium”
marketing setup where small users get the service free of charge
You're mistaken if you think punching through all these firewalls and CGNAT systems is easy.
This is networking at a very high level. Just if you want to shine in the next
discussion with your boss: They use “UDP hole punching” to get the job done. And the best:
All this complexity is hidden from us. We only have to accept the members of our network. Cool!
We now covered the simple cases where we can install Zerotier’s client software. This is good
for most use cases and the most secure because you easily can control the access rights.
If we cannot install software on a device or want to connect to all members of our home network,
we have to go a different way. In the video I mentioned before, I needed to connect a remote
radio that could not install a Zerotier client. This is why I used Zerotier on
the Teltonika LTE router and added the whole subnet of the remote station to Zerotier.
This is a bit more complex and not needed for everybody. So we say goodbye to the
guys leaving us with a working solution. For the rest: Let’s add our whole home network:
If you use IOTstack, select Zerotier and follow these instructions. They are the
best I found on the internet, BTW. If you do not know what IOTstack is,
I strongly suggest watching video #295 If you do not use IOTstack, you must install
Zerotier on a Raspberry Pi or a virtual machine on your Proxmox server. If you do not know what
Proxmox is, I suggest watching my video #443. You see, subscribing to this channel can add value.
For the rest of the video, you can replace “Raspberry Pi” with
Raspberry Pi” or “VM.” It works the same way. After installing Zerotier on the Raspberry and
connecting it to your network, you add your home network address range to Zerotier and tell it to
route all traffic through the Raspberry Pi. In IOTstack you are done and your Smartphone can
connect to your entire home network. If you have a barefoot installation, you have to install the
routing tables on your Raspberry using SSH. This is done by checking the Pi's different
interfaces and replacing them in these three lines. Write “sudo -i” before you start.
Now your Smartphone is part of your home network. You can even
check ”Allow Ethernet Bridging” if needed. As mentioned before, all our devices are still
connected to the internet. Zerotier transfers only the traffic of our private network.
If you want to route all the internet traffic of your Smartphone through your home network, you
also find the description in the IOTstack Wiki. Then, you are entirely secure and can also watch
your home country's TV even if you are abroad because the internet thinks you are at home.
What did we achieve today? - We learned why we do not have to pay for
a VPN service and how we can avoid its latency - We saw how difficult it is to create a VPN using
Wireguard or OpenVPN, the darlings of past times - We also learned how to “punch
UDP holes” without scarifying security - We used one of the new services called
“Zerotier” to create our first VPN connecting our Smartphone to
our Home Assistant server or home PC - We understood that this is fast and
cheap because direct connections are used - If you did not leave, you learned how to
connect a whole subnet and how to route the whole smartphone traffic through your home network
This was all for today. As always, you find all the relevant links in the description.
I hope this video was useful or at least interesting for you. If true,
please consider supporting the channel to secure its future existence. Thank you! Bye
https://zerotier.atlassian.net/wiki/spaces/SD/pages/224395274/Route+between+ZeroTier+and+Physical+Networks