AWESOME ROOM MAKEOVER || We Built Our Dream House! Genius DIY Ideas and Crafts by 123 GO!
Published May 25, 2023, 2:20 a.m. by Arrik Motley
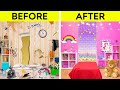
When we finally moved into our dream home, we wanted to make sure every room was perfect. So, we decided to DIY our way to the perfect home. We started with our living room and came up with some genius ideas and crafts that made it look amazing.
First, we decided to paint the walls a light blue color. This gave the room a calming feeling that we loved. Next, we hung some string lights around the room. This added a bit of whimsy and made the room feel even more cozy.
Then, we got to work on our furniture. We found some old chairs at a thrift store and reupholstered them with some new fabric. We also sanded down an old coffee table and gave it a fresh coat of paint.
Finally, we added some finishing touches like throw blankets and pillows. We also hung some artwork on the walls.
The whole process took us a few weekends, but it was so worth it! Our living room looks amazing and we did it all ourselves! We love how our DIY makeover turned out and we can't wait to tackle the next room in our house.
You may also like to read about:
Come on, hurry up.
I can't wait to get started.
We're finally here.
Let's go inside.
Are you ready roomie?
I don't remember it looking like this.
There was definitely a lot less spiders in the pictures.
It's gross.
We need to fix this.
That's better. Let's get to work.
I love a good makeover.
This wallpaper has to go.
Wow, that's really stuck on. Whoa!
Uh... are you ok?
Who turned the lights out?
What's going on?
This is so not funny.
That's it. Now it's personal.
This bed has seen better days.
Push! Woohoo. Go! Go!
How much do you weigh?.
You know, this is fun.
Nailed it!
Let's go bestie.
Taa-daa.
Check out these moves.
Urgh, who thought this was a good idea.
Oh, I've read this one.
We're almost finished.
We did it. Whoooo!
Uh... we missed some.
That's ok. We'll just rip it down.
Huh? Who draws the poop emoji?
Whoa. What is that? Is it snowing?
I love my job.
Hey. Stop it. The roof is going to... Run!
That was close.
That could have been nasty.
Wait... are you thinking what I'm thinking?
Lay a piece of foam tiling on a flat surface.
Next you'll need a rectangular piece of card.
Trace around the rectangle, onto the tile.
Repeat this all over the tile.
You want to create a brick like pattern.
Now we need to score the foam.
Make shallow groves in the foam, removing the ink.
All you have to do is follow the lines. Just like this.
Then fill in the gaps with white paint, covering up any remaining ink..
Now apply paint to the tile.
Place a small amount on each brick.
Start to paint the tile.
The foam gives a nice, textured effect.
Let's get this on the way.
Perfect, no more poop emoji.
It's look better already.
Great job.
Is that the door?
Hello?
Hi. I'm selling this amazing drill.
Nope!
Ahem! I hadn't finished.
I'm also cooking up a storm with this frying pan.
No!
What?
Ok. It's a deal.
I mean, oh no.
How about the mystery prize? Only two dollars.
Ooh... please... can we?
Why not?
Just another happy customer.
Now hand over the money. Bye bye.
I wonder what it is.
Let's open it.
Wow! It's a mirror.
This is just what we need.
I'll just get rid of this paper.
Uh... this might not have been a good idea.
The frame is damaged.
We can't hang this on the wall.
Hey. Come back.
Ahat. This is just what I want.
Sorry teddy, but I need your stuffing.
Looking to upgrade an old mirror, try this out.
Stick a strip of LED lights along the frame.
Bend the lights around the corners.
We want it to be one continuous strip.
Once you've done that, start to apply glue over the LED strip.
Make sure you don't miss any spots.
A zig zag pattern is ideal for this.
Almost done.
Now, stick the teddy bear stuffing onto the glue.
Give it a press to make sure it's secure.
Repeat this all the way around the frame.
Make sure that none of the LED strip is showing.
Once you've finished, stick artificial butterflies to the stuffing.
This is looking great.
This is starting to look more like a home.
And I love the lighting effect.
Wow. It's amazing.
It's like a little part of nature.
I look good.
All this work is making me sleepy.
This is so comfortable.
I'm so glad you came over.
I wouldn't miss it.
Mwah! Mwah! Mwaaah!
What a great sleep.
Whoa! Naomi! Wake up.
What is it?
Look.
Have you been kissing your pillow again?
Well... there was a cute guy in my dream.
It's ok. I have an idea.
Aw, it's my darling daughter. Yes?
Hi mom. We've got some lipstick stains on our pillows.
I'm on my way! This is an emergency.
My poor little baby. Mommy's coming.
Let's go!
Look out. Coming through.
Are you ok honey?
Oh, hi mom.
We've got a problem. See?
Don't worry girls. I've got this.
Place tape around the edge of the pillow.
Next, start to stick smaller pieces of tape at an angle.
Make a row of small triangles.
Repeat this all the way down the pillow.
Filling in any gaps with tape.
Once you've done that, remove one row of tape.
Just like this.
Be careful not to peel off any other tape.
Working down the pillow, remove every second row of tape.
Then, grab a brush and start painting.
Dab the brush over the top row of triangles.
The tape acts as a border, stopping any messy accidents.
Paint each row a different colour.
Once the paint is dry, peel off the remaining tape.
This part is nice and relaxing.
Again, be careful, we don't want to ruin any of our hard work.
Then just remove the tape from around the edges.
That's better than any lipstick stains.
What do you think girls?
Looks good, huh?
Whoa. It's awesome.
Thanks mom.
Oh I know. I need a photograph. Smile.
Aw, it's so cute.
I'm just glad I could help.
Bye mom.
Where can we put this?
Hmm. No.
Nope.
Ha! Look. I'm art.
We can't use this.
I don't know what to do.
Uh... who's that?
What is it?
A note... thanks I guess.
Open it.
I think it's a code.
Was that safe always there?
There might be treasure in there.
It's a pretty obvious code.
I wonder what's inside.
Wooden skewers?
Place a wooden skewer on a flat surface and apply a small dab of glue to the end.
Continue doing this until you have a large frame.
Place a skewer down the middle, splitting the square in half.
Glue another skewer horizontally to the frame.
Continue doing this, filling the frame.
Do the same vertically. Then paint it.
Personalise the frame by adding some decorations.
It makes a great way to display photographs.
There we go.
Our first photo frame. It's perfect.
We can put all our photographs on it.
It's just what we needed.
And it looks great.
There's nothing better than hanging out with my bestie.
Aw, we look so cute.
Having fun and creating memories.
Yeah! Finally, it looks like a home.
It looks good, right?
It was so disgusting.
What a difference.
And it's so bright and colourful now.
It was hard work, but it was totally worth it.
We hope you enjoyed this room makeover. What was your favourite part?
Let us know in the comments below.
Remember to share this video with your friends and don't forget to subscribe to or channel for more fun videos just like this one.


![Fng King - Glorilla Mode (Fet Finesse2tymes) [Official Video music video] image](https://i.ytimg.com/vi/vEaqRQFfWYs/default.jpg)