DIY Concrete Countertop w/ HIDDEN TV LIFT || How to Make
Published June 1, 2023, 3:20 a.m. by Arrik Motley
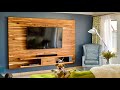
This time I show to make a diy concrete countertop with hidden motorized TV lift and alexa-controlled LED lighting.
Go to https://squarespace.com/modustrialmaker to get a free trial and 10% off your first purchase.
As part of my ongoing bedroom makeover / renovation, I wanted to hide the TV that was sitting on top of my dresser, so I decided to make a built-in cabinet for a motorized TV lift with a concrete top. I made the concrete countertop using gfrc concrete, and I made the cabinet for the TV lift from plywood. This meant that I had to make the lid for the TV lift from concrete, which posed some challenges. I also embedded aluminum channels for LED strips into the underside of the concrete countertops. To top it off, I added an alexa controller that allows me to control the LED lighting using alexa or Google Assistant. I'm pretty happy how the hidden TV lift came out.
MOTORIZED TV LIFT: http://bit.ly/2wbzxpU
\\ BEDROOM RENOVATION VIDEOS //
Dream Bed: https://youtu.be/GPihxS3LDAs
Soundwave Dresser: https://youtu.be/L-b6PDdT4Nc
\\ FOLLOW //
Instagram: @modustrialmaker - https://goo.gl/F4UdEs
Blog: https://www.modustrialmaker.com
\\ LED PRODUCT LINKS //
alexa LED controller for RGBW strips: https://amzn.to/2w6gOMm
12V LED power supply: https://amzn.to/2YCAvr9
RGBW 12V LED strips: https://amzn.to/2HtKutj
\\ MATERIALS //
Peel n’ stick wood panels: https://amzn.to/2HsVfvW
Plutonium Paint: https://amzn.to/2w9j8lw
HDMI/USB Wall Plate: https://amzn.to/2HwCCHD
gfrc concrete Mix: https://goo.gl/keUX8H
AR Glass Fibers: https://goo.gl/t4qpTN
Cake Fondant Tool for perfect edges: http://amzn.to/2w0JCVx
Helical Mixing Paddle: https://amzn.to/2GFyxjF
concrete mixer: http://amzn.to/2kEnZFi
Colored concrete pigments: http://bit.ly/2GxzWrf
1-part concrete sealer: http://amzn.to/2xW7Gth
Black 100% Silicone Caulk: http://amzn.to/2B64iRY
Paste Finishing Wax: http://amzn.to/2kF565e
“From Scratch” gfrc Recipes: https://goo.gl/35RvFM
concrete Screws / Bolts: https://amzn.to/2ElY6Vv
\\ TOOLS //
SawStop Table Saw: https://amzn.to/2YBfNrH
Fine finish miter saw blade: http://bit.ly/2w8RuVZ
Melamine blade: http://bit.ly/2JwhdjG
Cordless Circular Saw: http://bit.ly/2Vmuz7T
Cordless Miter Saw: http://bit.ly/2Zx6quE
Cordless Hammer Drill: http://bit.ly/2ZuKsIw
Cordless Multi-tool: https://amzn.to/2JOFReQ
A special thanks to TVliftcabinet.com for providing the TV lift: https://www.tvliftcabinet.com
Thanks also to Plutonium Paints for providing the spray paint: http://bit.ly/2JRPWYE
This video is sponsored by Squarespace
You may also like to read about:
what's up guys welcome to my bedroom as
they say this is where the making
happens
[Music]
there are a number of products that have
been on my channel in the past in here
behind me of course got the dream bed
build we've got the Soundwave dresser
right down there as much as I love this
room there's still one thing that's not
quite right the TV that sits on the
Soundwave dresser is too low to really
watch in bed and it's kind of an eyesore
to solve this problem I'm going to build
a faux wall that's gonna hide a
motorized TV lift and to give this build
a little something extra I'm going to
hide the TV lift under a 7-foot concrete
countertop which will have integrated
LEDs let's get going and see how it's
done and a big thanks to Squarespace for
making this video possible I started by
breaking down the melamine for the
concrete forms in my garage why am i
garage you ask well because I can't get
four by eight sheets into my basement
shop it's just to trade off they're
living in the city I suppose once I cut
the melamine to a manageable size and
had it in my shop I could cut out the
base of the main concrete form by the
way if you haven't seen my past videos
the melamine is used to make a form
which you pour the concrete into there
are a number approaches to making
concrete forms but for this build I'm
going to cut the base pieces to the
exact shape of my countertop
[Music]
so I've got the base of the form right
here I'm just going to do a quick test
fit into the windowsill and over the TV
left to make sure that it fits properly
because we can only pour once no going
back after rapport we can't trim it to
fits one other thing to note is that
when we test fit this we're going to put
it in in the same orientation that the
concrete countertops going to go in but
when we do the pour we're actually going
to flip this base piece over because
we're pouring upside down and everything
needs to be the mirror image it looks
good so back to the shop now we'll make
this form I set up my table saw with a
new melamine blade to cut the sides for
the concrete form in the past I've used
my standard woodworking blade for
melamine and it sometimes chips off the
plastic edges no such problem here with
the melamine blade the edges were just
gorgeous I'm definitely a convert
for the mitered edges on the sides
there's no need to measure the angles
exactly the seams will be caulked later
on and that will fix any small
inaccuracies in the joints I find it
easier to hold the pieces in place and
mark where to cut align the laser on my
miter saw with that mark and then cut
[Music]
so I've got all the sides of the
melamine form cut to length and they're
all one in 3/4 inch high which minus the
3/4 inch size the melamine is going to
give us one inch thick counter tops all
that's left to do now is go around with
some drywall screws and hot glue and
assemble the form
I'm about to make a foam cutout that
will go into this main concrete form and
create this space where the concrete lid
will sit on top of the TV lift this
piece right here is actually the base of
the separate concrete form that I'm
gonna make for the lid I have to be very
careful and plan ahead to make sure that
when I pour the lid it's going to fit
inside but not be too loose within the
hole that I create in the main
countertop at this point I've left the
base piece for the lid at 1/8 inch
bigger than it needs to be in both
direction so by cutting the foam to the
exact same size I'm actually making the
bigger cutout that the lid will fit
inside and the melamine blade was still
on the saw and it left a really smooth
edge on the foam as well so I think I'm
gonna give you getting double duty from
this play a fine finish played like the
one I have on my miter saw here also
leaves really clean edges on the phone
link to both below I use two spacers cut
from scrap melamine to position the foam
parallel to the front edge of the form
and then hot glued the foam to the base
I trimmed 1/8 inch off of the base form
for the lid on both end and made sure
that it fits snugly inside the cutout I
was leaving for it in the main counter
top next it's time to seal the form with
caulk for those of you new to the
channel well where have you been all my
life and this is my go-to process for
getting perfect calls lines I apply a
layer of paste wax to the mellah lean
lay down a generous line of a hundred
percent silicone caulk and run a metal
fondant ball tool over all the caulk
lines the fondant tool pushes excess
caulk to the sides and leaves a clean
line over the seat and the paste wax we
laid down earlier makes it easy to peel
away the excess caulk once it cures
leaving a perfect caulk line
after the caulk is cured I applied two
layers of polycrylic to the foam my
thought was that the polycrylic would
make the foam easier to remove and seal
it and as you'll see later I think it
worked pretty well so I'm all set up for
the pore now and I want to show you two
things before we get going that I did
off-camera so first I cut this AR glass
scrim and this is a sort of sheet of
glass fiber that's made from the same
type of alkali resistant glass fibers
that goes in the GFR C but it's just a
whole sheet and since this piece is
going to be one inch thick and it's
going to be almost 7 feet long this is
going to add some flexural strength to
it that spans the whole length of the
countertop second I've made the form for
the lid the one interesting thing about
the lid is that I'm actually going to
embed some pieces of half-inch plywood
in the lid and that's gonna give me
something to screw into so that I can
attach a concrete lid to the TV lift so
in order to position those pieces of
half-inch plywood at the right spot at
the very top of the form so that are
going to be flush with the base of the
concrete just constructed these little
bridges from some scrap melamine so that
will hold it right at the top here
during the pour and then I can just
remove the screws when I'm done and
leave the half-inch plywood in the
concrete I also put a coat of poly
acrylic actually two coats onto the
half-inch plywood so that water doesn't
get into it from the concrete during the
pour
at this point I made a last-minute
design decision I decided to embed some
aluminum channels for LED strips in the
underside of the concrete so I cut those
channels to size now it's time to get
ready for the concrete spray and pour
for me this involves rearranging the
entire shop and then Dexter find it by
covering the whole thing in plastic I'll
be using a glass fiber reinforced
concrete mix or GF RC for short you
could also make this with any bagged
concrete mix however GF RC allowed me to
make the countertop thinner and lighter
cutting its weight in half
GF RC mix is naturally white but I
wanted to make a grey or almost black
countertop so I added the maximum amount
of black powder pigment that I could
without weakening the concrete to get a
cleaned surface on the counter I'm going
to be applying a face or Beauty coat to
the form first which doesn't have any
aggregate in it I first brush a thin
layer of the face coat into the corners
which prevents sand from being trapped
when I subsequently spray a thin coat on
the rest of the surface and that brings
us to the next step spraying the thin
Beauty coat with a hopper spray gun
the coat is sprayed at about 1/8 inch
thick with what essentially is a drywall
hopper modified to orient the sprayer at
45 degrees to the hopper so you can
spray more easily on horizontal surfaces
immediately after spraying each face
coat I use a chip brush to go over the
concrete and pop any bubbles that might
have been trapped against the form
during the spray this ensures the
smoothest possible surface right out of
the form
[Music]
it's not quite ready for the back coat
you can see it's still a little mushy
there's a risk that glass fibers will
push through so we're gonna wait another
say 30 minutes or so just for it to firm
up a bit more say test it again and it
was good to go before the back coat I
went back and removed some painters tape
I had covered the top edges of the form
with this was an experiment to try and
avoid the face coat going up and over
the sides as it typically does and the
resulting need to grind the concrete
level to the size after it cures I
forgot to put tape on the foam knock out
so I carefully used a trowel to scrape
the excess face coat off the top of the
foam it worked surprisingly well
although I still can't say that this
would be really a good idea to repeat if
you're making this then I mixed up the
backer coat which is the exact same GF
RC mixes the beauty coat except that
glass fibers are added and these are
special alkali resistant glass fibers
that don't break down in the alkalinity
of concrete like a normal glass fiber
would these glass fibers combined with a
polymer and a water reducing admixtures
an incredibly strong concrete likely
around 12,000 a 13,000 psi compared to
you say five or six thousand for a
standard concrete a hand packed the
first layer of the backer coat and then
placed the a hourglass scrim that I cut
earlier into the form I worked the AR
scrim into the back coat so it was just
slightly below the surface and then came
back with a second layer of the back
coat to fill up the form
[Music]
when the former's fall I came back with
the aluminum led channels and press them
into the concrete doing my best to get
them even with the sides of the form I
then turn my attention to the form for
the lid and I put a little bit of
concrete under the locations where the
plywood sheets would be inserted this
one's sure that there are no gaps
between the plywood in the concrete and
then filled up the rest of the form
around the plywood sheets and let
everything rest I tried another new
technique in this build
hand traveling the underside of the
concrete with a magnesium float we'll
definitely be doing this more often
since the underside came out much
cleaner and required less messy
post-processing like a lot of you I'm a
one-man show in the shop so I decided to
deem old and flip over this 180 pound
countertop and form myself
[Music]
flip went smoothly but those few seconds
you've danced around the table to catch
the counter on the other side are always
pretty nerve-wracking there are many
ways to post process precast concrete
pieces my go-to is wet sanding by hand
with 400 grit sandpaper since it is
quick and easy and leaves a nice smooth
finish for the sealer I decided to try a
two-part urethane after mixing Part A
and B you dilute the mix 5 to 1 with
water and roll on a primer coat the
diluted primer coat penetrates the
concrete more easily so you can get a
deeper and longer lasting finish you
then continue to roll on the sealer
increasing the strength to 3 to 1 C
litter water and finally use a full
strength sealer mix now I really like
the finish I got with this two-part
sealer but I'll have to see how it holds
up over time as compared to other
concrete pieces that I've finished with
a simple one part acrylic sealer and see
if the extra effort is worth it for the
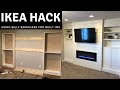
two-part sealer now let's turn to the TV
lift cabinet itself I'm using a
motorized TV lift from TV lift cabinets
calm and specifications for the cabinet
come with the whip so I'm only going to
go through this at a fairly high level
since the cabinet carcass will be
completely hidden I built it from an
expensive radiata pine plywood and
pocket hole joinery pocket holes don't
always get a lot of love but for a
project like this using a pocket hole
jig makes the joinery fast and easy it's
really the perfect tool for the job
[Music]
installing the TV lift in the cabinet is
simple it comes preassembled so there
are only eight screws in total for the
install the first step is mounting the
lower support plate at the base of the
cabinet then you slide the CV lift
assembly into the support plate and use
the mounting hole in the lift to attach
the top of the lift to the cabinet the
TV lift control box also attaches easily
to the back of the cabinet with four
screws I also added a lid support to the
top of the lift which I'll attach the
concrete lid to the cabinet will be
covered by a removable front panel this
front panel will be entirely removable
from the cabinet so you can access the
TV lift if needed and will be held on by
magnets the rare-earth magnets I'm using
are square so I created square cutouts
in the back of the panel using a
Forstner bit and a chisel I bought
countersunk magnets which allowed me to
screw them right into the back of the
cover panel using screws I chose this
approach so the front panel will look
like part of the wall structure in my
room more so than it would if I used
doors to provide mounting points for the
magnets
I used an angle grinder to cut small
pieces of scrap steel I then used my
router to create cavities for the steel
pieces in front of the cabinet carcass
and inlay the steel pieces in the
cavities using some five-minute epoxy
you may have noticed that the front
panel is cut from OSP which might not be
the most obvious choice however as you
see here I'm covering the front panel
with some permanent peel-and-stick wood
planks since you won't see the
underlying wood used on the front panel
it was the perfect opportunity to make
use of some OSB that had been taking up
space in my shop for quite some time so
I'm about to finish putting this peel of
stick wood on here and with the VHB on
tape on there it holds pretty well but I
just had kind of had a change of heart
on it I think it's still a great project
for very beginning DIY folks kind of get
them over the initial hurdle but once
you're comfortable using a nail gun just
use a nail gun I also added some cable
management with a built in panel that
can plug in HDMI and USB cables from
outside of the cabinet this panel
installs in the standard cutout for a
light switch or other similar panels and
with that the cabinet was ready to take
upstairs for the installation I use my
hammer drill to pre-drill holes in the
brick wall for tapcon concrete screws
it's extremely important when using
concrete screws that you vacuum out the
holes before inserting the screws as
long as you vacuum these screws do a
great job of securing large pieces to
brick or country I enlisted the help of
my friend Griffin to move the countertop
into place for now I just have blocks of
scrap 4x4 that are resting on the brick
windowsill and combined with the cabinet
to support the countertop from below I
screwed the concrete lid into place and
then moved on to the trim now at the
corner where the wood meets I'm going to
be using an l-shaped aluminum channel
and I spray painted it black so it would
match the look of the room I attach the
aluminum trim using fuse it and I only
put the fuse it on the side of the trim
that would attach to the front panel so
that it wouldn't adhere to the side and
prevent the front panel from being
removed now I can install the LED strips
into the aluminum channels embedded in
the countertop I used the combination of
adhesive backing on the LED strips and
super glue to attach the LED strips to
the channel while I used basic RGB LED
strips for this project I did add a
little something extra by using an LED
controller that allows me to control the
strip's via Alexa Alexa turn the
countertop lights on Alexa set the
countertop lights to green so I had no
idea if this was really gonna work with
concrete since is definitely a lot
heavier even with GF RC than a wood top
but it works really well and I'm really
happy how it looks I think it really
completes the bedroom as always there
are a couple things that I would do
differently if I were to build this
again so I just want to go and in full
disclosure show you things that I'm not
100% happy with so the first thing and
probably the biggest thing is that
because I could only cast one piece of
the countertop on my flat work table I
catch the other one in the floor and I
thought that the foam that I put it on
would level it out but it kind of got a
little banana in the lid piece it'll be
a little tricky to color match but at
some point I may go and remake the lid
just to make sure it's perfectly flat
and doesn't have that little bit of
curve banana shape to it that just a lot
of people don't notice but I do the
second thing is I still haven't put trim
around the floorboards now I just hate
like standard white crown molding trim
so I always have really hard time
picking that out I'm not sure what I'm
gonna do but something different if you
got any ideas for the trim I'll leave a
comment below and let me know before
going further let's show a little love
to this video sponsor Squarespace
Squarespace gives you a powerful and
beautiful online platform to create your
website two years ago when I was
starting Modesto maker and looking to
create a website I was trying to find
the easiest way to do it I quickly
realized that Squarespace was a
no-brainer Squarespace provides you with
an all-in-one platform so you can create
your beautiful website or online store
their award-winning templates make it so
easy that anyone can do it and they work
for all types of creatives and
businesses from musicians to designers
to restaurants and beyond there's
nothing to install patch or upgrade ever
plus you'll get square
faces award-winning 24/7 customer
service if you're considering a new
website or revamping an existing one do
yourself a favor and head over to
Squarespace comm slash Minh dust real
maker and you'll get a free trial plus
10% off your first purchase not only
will you get a great website but you'll
be supporting this channel and the free
content that you enjoy here so thanks in
advance from me and thanks to
Squarespace for making this video
possible all that's left to do now is
for you guys to hit the subscribe and
bele button hit the thumbs up button to
show your support for this channel and
check out the shots of this TV Lift in
action
[Music]