DIY IKEA HACK KALLAX TRANSFORMATION | FLUTED SIDEBOARD
Published June 1, 2023, 3:20 a.m. by Arrik Motley
diy ikea HACK kallax transformation | FLUTED SIDEBOARD
interior designer: Kristen McGowan
This diy ikea Hack is transforming this ikea kallax unit into an on trend fluted custom sideboard for my entryway! This is an easy, doable diy using minimal tools! This will definitely give your affordable ikea unit a more high-end luxury look for less! If you have this kallax unit, you NEED to try this diy! Follow along as I show you the full tutorial so you can achieve this exact same look yourself, all the products/tools used are linked below! I am using mine for shoe storage and front entryway storage to hide the clutter! Stay tuned for the full Entryway makeover on my channel coming up next! #ikea #ikeahack
▶ NEW EMPTY LAKE HOUSE TOUR: https://www.youtube.com/watch?v=jfngPxKmPNA
▶ NEW EMPTY OFFICE TOUR: https://youtu.be/5Wj5C9c4958
▶Previous Video: https://www.youtube.com/watch?v=Gqva2WL84lY
- I N T E R I O R D E S I G N T I P S P L A Y L I S T -
▶ https://youtube.com/playlist?list=PLLFZWs9eFKMfK-nl3qdOxXiwzna5KQrCf
- P R O D U C T S N E E D E D -
ikea kallax: https://go.magik.ly/ml/19edf/
kallax doors: https://go.magik.ly/ml/19edg/
1/2 round molding: https://go.magik.ly/ml/19eld/
Primer: https://go.magik.ly/ml/19edh/
Behr Paint colour (Almond Wisp): https://go.magik.ly/ml/19edi/
Miter Box + Saw: https://go.magik.ly/ml/12i33/
Cordless brad nailer: https://go.magik.ly/ml/19edk/
Sanding block: https://go.magik.ly/ml/19edl/
Wood filler: https://go.magik.ly/ml/19edm/
Caulk: https://go.magik.ly/ml/19edn/
Verathane polyurathane: https://go.magik.ly/ml/19edo/
feet: https://s71.co/3Crkp8u
Cabinet hardware: https://s71.co/3s0qMuI
- S H O P M Y L O O K -
Hair Curler: https://go.magik.ly/ml/16rge/
It cosmetics cc cream: https://go.magik.ly/ml/16rgf/
- S H O P M Y F A V O U R I T E S -
Dyson Animal v8: https://shop-links.co/1745472970652828486
Mattress topper: https://shop-links.co/1745473009402519370
Ninja Blender: https://shop-links.co/1745473025988836639
Nespresso machine:https://shop-links.co/1745473053176895255
Under bed storage: https://shop-links.co/1745473079710366659
Pantry Organizers: https://shop-links.co/1745473100572283549
Joseph Joseph expandable tiered organizer: https://shop-links.co/1745473212730410559
Batiste Dry shampoo: https://shop-links.co/1745473229315884254
It Cosmetics CC Cream: https://shop-links.co/1745473247223563869
It Cosmetics Bye Bye Under Eye: https://shop-links.co/1745473262697398276
Benefit They're Real mascara: https://shop-links.co/1745473281033097002
First Aid Beauty cleanser: https://shop-links.co/1745473301754422189
First Aid Beauty Moisturizer: https://shop-links.co/1745473317538222635
- R O O M M A K E O V E R S -
BATHROOM MAKEOVER: https://youtu.be/81hJHT-u_Uo
DINING ROOM MAKEOVER: https://youtu.be/GmZxKPCuRyQ
SMALL BATHROOM (POWDER ROOM MAKEOVER): https://youtu.be/3bbGZj9qGdM
STAIRCASE diy MAKEOVER: https://youtu.be/h3jD9qDprxs
MY BEDROOM MAKEOVER: https://youtu.be/HnlTfkQ9yWE
MY BEDROOM MAKEOVER ROUND 2 : https://youtu.be/KurKmz0GDBw
BACKYARD MAKEOVER: https://youtu.be/R8tDYEWhtUw
BOHO TODDLER BEDROOM MAKEOVER: https://youtu.be/aWWzaveJQbA
FRONT DOOR MAKEOVER: https://youtu.be/ja-xabLdjII
SURPRISE BEDROOM MAKEOVER: https://youtu.be/qEcVwVzBBCE
LIVING ROOM + ENTRYWAY MAKEOVER: https://youtu.be/FvY4ll1vF2k
MY LIVING & DINING ROOM MAKEOVER: https://youtu.be/IunMAzxbxHI
SHARED KIDS BEDROOM MAKEOVER: https://youtu.be/iCQoMQj8Jr4
MULTI-PURPOSE ROOM MAKEOVER: https://youtu.be/q-118ksa1os
- F O L L O W M E -
▶INSTAGRAM: @kristenmcgowan
https://www.instagram.com/kristenmcgowan/
▶TWITTER: @kristenmcgowann
▶SNAPCHAT: kristenmcgowan
▶BLOG: https://www.kristenmcgowan.com/
▶BUSINESS INQUIRIES: digitmgmt@gmail.com
FTC // Some links may be affiliate links.
*The images used in this video do NOT belong to me. They are all from Pinterest.com or Google Image Search.*
You may also like to read about:
hey everyone welcome back to my channel
my name is kristen
and today we're getting started on a
huge ikea hack transformation we are
transforming my old ikea calyx unit
into a beautiful fluted sideboard for
this front entryway
i like how much storage space there is
in it but i really don't like the way it
looks
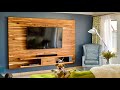
i'm going after this whole look here if
you were to shop these pieces
they cost thousands of dollars so this
is going to be an affordable way of
getting the look for less
if you were to buy an ikea calyx unit
they are 70
so they're pretty affordable for a big
storage piece but i actually got this
completely free
it was left behind at an old apartment
we had so i just took it with me and
i've been using it in every space ever
since
next i'm going to be doing a full
makeover on this front entryway so after
we tackle the ikea calyx unit
we can transform the entire space but i
know a ton of you guys have the calyx
unit as well and you might be interested
in transforming yours too so let's go
ahead and jump right into it
i'm kristin interior designer and home
decor expert
i'm sharing all of my designer tips and
tricks with you to help
transform your house into the home of
your dreams through diy projects
affordable home decor styling tips
and home organization if i can do it you
can too
let's make our homes look and feel their
best
[Music]
so i really want to minimize the
busyness of this unit i want to create
full solid looking doors going all the
way down here so i can have
them open just like a cabinet i found
the easiest way of doing that
was just starting with the ikea calyx
door
this actually comes as like a little
cubby box definitely a lot easier than
buying wood for the outdoor piece
getting hinges fitting that in properly
i knew just going with this box it would
fit in these slots perfectly
this door solved one problem it fits
this way but i wanted
a full-size door so i'm gonna be putting
all the cubby doors in
but actually finishing the outside using
these half round molding pieces so from
the front
these molding pieces are going to kind
of look like a full-sized door
because they're going to lay right over
top of the individual doors and kind of
hide that gap so that's kind of where i
went with this i thought it was going to
be the easiest do-able way of covering
the entire front of this unit and
making it just a lot easier just to
install doors that are kind of
already fit to size
[Music]
so i just moved the unit out to the
garage i actually
put it up on just some little weights so
that i can
paint the bottom without hitting the
floor i put a little drop cloth down
just from the dollar store and i'm
getting ready to start
priming so i'm just using this little
roller i'm going to be going around
all of the edges i'm not going to worry
about the inside
i'm just focusing on all the outside
pieces
and the top and the sides if you were
painting ikea furniture
you should definitely use this primer
it's the zinzer bullseye123 primer and
it adheres to pretty much
any surface without sanding so it's
perfect for
all of the ikea furniture that's pretty
shiny and smooth i'm also priming the
door fronts and edges
i'm just lifting them up off the floor
using plastic cups but if you have
risers you can definitely use those
i realized after i didn't really need to
prime and paint the front of the door
since we're
covering them anyways but i did it just
in case there was anything that ever
showed through
this primer only takes 30 minutes to dry
so it's a really quick process
[Music]
so for the paint color i'm just going to
be using almond wisp by bear
and i got a sample size these are just
five dollars to pick up
so very affordable i think it should
cover everything i need
it's a nice kind of beigey taupe light
color and i think it's gonna look
really nice all the sample sizes
actually come in a satin finish
which i was looking for anyway so i
think that's going to work out well
[Music]
so to make sure i don't have any streaks
or brush marks i'm using
a small foam roller to do all of the
painting that way it goes on very smooth
and looks super even
[Music]
okay so i would actually suggest getting
a little bit more paint than i did i'm
gonna have to go
and get a little bit more that was
enough to do
two coats on the top sides fronts
and just one coat on the doors for now
i'm going to start getting the cubby
inserts in so we can get the doors on
and start building from there
so this little calyx door system is
pretty cool
you can just insert this little cubby
and it has the exact spots to put
the screws for the hinges this side just
holds it all
in one thing to note is they actually
say to use this little spacer
that would actually slide this insert
back a bit
and that would make sure that the door
is kind of set into the cube
i want the door to be on the outside so
i can connect the entire
panel without a gap so i'm actually just
going to slide it right to the outside
edge here
and install it there
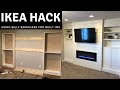
so this is what the calyx unit looks
like with all eight doors installed
i think it's just a little too many
squares for my liking
so i'm actually going to attach half
round molding pieces
to connect the top door like this
to the bottom door and that way it's
going to fill that gap in between and
give the
look of one long solid door
i picked up 20 of these half round
molding pieces from the hardware store
they originally were about 10 feet long
so i cut them down
to be 27 inches using my miter box
this is such an easy tool to use with a
simple saw
you can cut 90 degree angles 45 degree
angles
without using any power saws if you are
new to using tools you can definitely
use this it's about 15
from the hardware store so it's very
affordable and it makes it a lot easier
to make simple cuts
see how the edges are pretty rough i'm
just gonna use
this 120 grit sanding block just to get
all of the edges really smooth
i'm attaching all of these molding
pieces using my
cordless nail gun
[Music]
i ended up using 18 pieces across so if
you get the same molding
you can count on 18 per door it totally
softens everything now that we have all
these rounded edges
once it's painted it's going to look so
[Music]
good
[Music]
now to give this a very smooth finish
look i'm going to be filling all of
these nail holes using
wood filler you can just put a tiny
amount on
smooth it out with your finger sand it
down and then it's ready for painting
again i'm using the same zinzer primer
to go right over top of the wood
that way i don't have to sand it down
and it will really create a nice surface
to paint over
[Music]
so i tried to get most of these seams
really tight together
but some of them are showing bigger gaps
like this so i'm just gonna use some
all-purpose paintable
caulking to really just smooth out that
seam
[Music]
all right i got the little cord of paint
from home depot it's the same color
as what we initially painted it but it's
actually in a flat finish the guy
working in the paint section said since
you're doing a top coat you might as
well just do a flat paint
it adheres better and it's actually
cheaper
[Music]
now because this is going to be in the
entryway and it's going to be used a lot
i'm using the verithane triple thick
polyurethane to go right over top this
is going to protect the unit from
getting
chipped and marked up i'm putting it on
using
my foam brushes these are just so that
you don't get any brush marks and you
get a nice smooth finish
this stuff is pretty drippy so if you
see little drip marks like that make
sure you smooth them out because they
will dry like that i'm doing about two
coats and this is in a satin finish
so i think if you're doing this you
could definitely just stop here you
don't need to add hardware you don't
really need to add feet but i do want to
elevate it a little bit and bring the
height up so i ordered
these legs off of amazon they came in a
pack of four and i like that they have
that nice
curve to the front of them so it really
kind of softens everything
but the contrast is gonna look really
beautiful
[Music]
okay i just realized that the bottom of
this unit isn't really
completely flat this kind of comes out a
little bit more so i can't really attach
the leg right to the edge so maybe
i'll have to just slide it into here and
the legs
won't be right at the end but they're
still going to be like lined up with the
doors
[Music]
all right and the last thing we're gonna
do is install the hardware
again this is optional you can pick
whatever style hardware you want
i got these off of amazon they came in a
pack of four
i'm gonna attach these on the third
dowel in
and then the other one here so that we
get a double door effect
[Music]
okay all the finishing touches are in
and i can't wait to show you guys what
this looks like
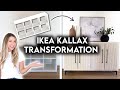
we've totally transformed this ikea
calyx unit
from a plain white boxy very standard
ikea piece
to a custom beautiful sideboard from my
entryway
i am in love with the way it turned out
the color the shape
everything it's totally what i was going
for so let's bring it inside and i'll
show you guys what it looks like in the
entryway now
[Music]
so
[Music]
let me know down below in the comments
what you guys think of the new and
improved calyx unit
i absolutely love it i love that it
hides all of the shoes
it's something pretty to look at right
when you walk in and i can't wait to
integrate it into the design
of the entryway space so next up we're
gonna be doing an entryway makeover and
it's
really all gonna come to life if you
enjoyed watching make sure you give this
video a big thumbs up and hit that like
button
and make sure you guys are subscribed to
my channel so you don't miss those
upcoming videos
click that red subscribe button down
below and make sure you guys have any
notifications turned all the way on so
you're first to see the next video
love you guys so much and i'll see you
in my next one bye