DIY Wood Wall and Floating Shelves
Published May 28, 2023, 7:20 a.m. by Liam Bradley
When it comes to entertainment, there are many different ways that people like to spend their time. For some, this means going out and about, while others prefer to stay in and relax. However, there is one activity that seems to be enjoyed by all – DIY.
DIY projects are a great way to spend some time, whether you’re by yourself or with friends. They’re also a great way to save money, as you can often find everything you need for a project at a fraction of the cost of buying it new.
One popular DIY project is creating a wood wall. This can be done using a variety of different materials, but the most popular is pallet wood. Pallets are easy to find and relatively cheap, making them the perfect choice for a DIY project.
To create a wood wall, you’ll first need to gather your materials. You’ll need pallets, a saw, screws, nails, sandpaper, and paint or stain. Once you have everything, you can start putting your wall together.
Start by cutting the pallets into the desired size and shape. Next, sand down the edges to make sure they’re smooth. Once the pallets are ready, it’s time to start screwing or nailing them into place.
If you want, you can stop here and simply enjoy your new wood wall. However, you can also take it one step further by adding floating shelves. These are easy to make and add a nice touch to any room.
To make floating shelves, you’ll need some wood, screws, L brackets, and paint or stain. Start by cutting the wood into the desired size and shape. Next, screw the L brackets into place. Once the brackets are in place, you can screw the wood onto the brackets.
Once the shelves are in place, you can add whatever you want to them. Books, plants, pictures, and other knick-knacks all look great on floating shelves.
DIY projects are a great way to spend some time and save money. If you’re looking for a project to take on, consider creating a wood wall or floating shelves.
You may also like to read about:
this week I'm moving back to my living
room to take care of this boring wall as
you can see the television is not
centered the wall is left unpainted and
it's just it's just a little boring so
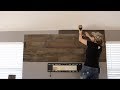
to spruce it up I'm gonna be adding a
wood wall with some floating shelves I
first got started with centering up the
television which was as simple as
removing the bracket finding Center and
then reattaching it after giving the
wall a quick coat of paint to match the
other existing walls I then used a level
to draw a level line where I wanted my
wood wall to stop now I'm not gonna be
carrying the wood wall all the way down
to the floor because one the
entertainment center will be blocking it
but then too I have all these outlets I
did not want to mess with moving back up
to the bracket I was not going to be
able to but the paneling up against the
bracket or the mounting hardware for the
television would not be able to go back
on so I held the panel in place at a
safe distance and made a mark then also
repeated the process for the lower end
of the bracket I once again used a level
to draw a line all across the wall
before throwing up material I first
located and then marked all my studs now
I have seen plenty of these walls that
are made from real wood pallet wood
reclaimed wood all sorts but I'm
personally going to be going with a faux
wood panel that you can find at Rockler
it is a urethane composite material that
is very lightweight but has an
unbelievable real wood look to attach
these boards to the wall I'm personally
going with construction adhesive now
this does mean if I ever want to remove
the panels and I'm gonna have some
drywall repair to do but that doesn't
bother me since I do plan for this to be
a permanent feature after applying the
construction adhesive to the back of the
board I started applying the wood to the
wall I took my time with this first
board making sure that the placement of
the right alignment was exactly where I
wanted it to be since the rest of the
wall will be lined up to this one then
of course made sure that it was level
with that level line I drew on the wall
earlier I am using an instant grab
construction adhesive but even so I
decided to come back with an 18 gauge
brad nailer and attach it to the studs
while that construction adhesive had
time to set up a little bit things look
good so I repeated the process
I would use a tape measure to measure
what the next board needed to be cut out
cut it and then put it up on the wall in
the same fashion the panel said I'm
going with actually come in two
different sizes a wider and a narrower
so just make sure if you're using the
same panels that one you vary up your
rows to just add a random looking wall
but then to you say consistent with the
board size you're using throughout the
entire row so I said earlier that if I
ever want to take this down I will have
drywall repair work to do if you want to
tackle this project and want the option
of taking it down later then I would
recommend first laying down some
quarter-inch hard board to the wall I
would do this by attaching it to the
studs then you can come back and use the
construction adhesive to place the
paneling on top of the hard board for my
wall I tried to vary up my seams as much
as possible so sometimes I would start
off with a full board and then other
times I would start off with a cut off
this stuff cuts very easily
I personally was using a projects all
that Tritan tools makes for flooring it
works great for anything thin like this
but this paneling also rips really well
at this table saw whenever I got near
the top I had to rip the boards down to
fit and I ran them through my table sole
just like I would any other board after
getting the top done I repeated the
exact same process for the sides as well
as the bottom once again making sure
whenever I got to the bottom that the
board I was about to place was not going
to interfere with that television
bracket and I must say this is by far
the easiest project with the most
drastic change I've ever done so I
definitely recommend taking it on if you
have a bear wall or just looking for a
good beginner project with that done I
could then mount the television of
course with a little help and then
Center it on the wall and I really could
have stopped here but I thought the wall
was still a little plain and it was also
very dark so I decided to add a few
white floating shelves however I didn't
want the space to look overly crowded so
I decided to add one floating shelf on
the left but three on the right since
I plan to paint the shelves I'm making
mine from a 2x8 pine board I set up a
stop block at my miter saw and first cut
all of my boards to length I use my
router to apply a Roman ogee profile to
the bottom of the shelves then gave them
all a quick sanding before sealing the
knots
remember if you paint anything white and
don't seal the knots they will
eventually bleed through
so attach these to the wall I'm using
some hardware specifically made for
floating shelves I first located the
studs and attach two mounting brackets
to the wall using a small level to make
sure that they were in line with one
another and if you'd like more
information on anything I'm using in the
video I have lefty links down in the
description after getting both of the
mounting brackets attached to the wall I
transferred the marks over to the
floating shelves
I took the shelves back to the workshop
and clamped them in my super jaws then
used a router with a straight bit to
mortise out where the brackets would
fall on the shelves this will allow
these brackets to be sunken to the Shelf
three won't be able to see them if you
walk up to the shelf and look down on it
this hardware comes with two rods that
attach to those mounting brackets so
next I drilled the corresponding holes
for these rods to go after we repeating
for all of the shelves I could then
attach the rods to those mounting
brackets and then start hanging my
floating shelves and the very last step
was to decorate the shelves with some
knickknacks personally I'm really
pleased with the project not only with
how easy it was but also just how much
it changed the look of this space
now that I finish this wall is dying to
build an entertainment center isn't that
the way things go but I hope that you
enjoyed this video
big THANK YOU to Rockler for supporting
my channel and the OLC o on whatever my
next project is