DIY DECK MAKEOVER | FULL RENOVATION (+ EXCITING NEWS)!
Published May 15, 2023, 2:20 a.m. by Bethany
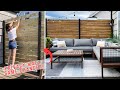
The diy Huntress is back with another exciting deck makeover! This time, she took on a full renovation, and the results are amazing. The before and after pictures speak for themselves – the deck is now a beautiful and functional space that the whole family can enjoy.
The best part about this project is that it was all done diy-style, so it was very budget-friendly. The diy Huntress shows us how to transform a tired and outdated deck into a beautiful and inviting outdoor space, without breaking the bank.
If you’re thinking about giving your deck a makeover, definitely check out this tutorial. It’s packed with helpful tips and tricks that will make the process a breeze. And when you see the final result, you’ll be so glad you took on the challenge!
You may also like to read about:
[Music]
hi friends it's sam and today we're
going to finish my deck makeover well
we're not really going to like actually
finish it today it's going to take a
couple of days because there's still a
lot to do but in today's video
specifically we're gonna finish my deck
makeover there's a lot to do so let's
get started
[Music]
this video is sponsored by anchor all
right friends so what is a good diy
video without a recap of how it started
so here is what my deck looked like when
i started this project at the beginning
of july now i cover a lot of the gritty
details about like the before process in
this deck in part one of this deck
makeover series if you missed that video
you can check it out i've linked it
below this video in the video
description but given you all the spark
notes version here essentially most of
this deck was in pretty solid condition
minus the railings and the stairs which
were kind of rotted so i really wanted
to just kind of keep what i could demo
what i needed to and start the process
of creating a more modern look for this
deck that had a little more privacy so
that we could have a little bit of an
oasis in our backyard
now once i was done demoing all of the
parts of the deck that could not really
be salvaged i decided to pressure wash
and sand down the existing deck boards
and also replace the steps before giving
everything a fresh coat of stain
i then rounded out part one of my deck
makeover series by rebuilding the
skirting on the bottom of the deck to
something a little more modern and
rebuilding the stairs which leads us to
today's video where i finish the rest of
this deck
[Music]
well there's like 32 more of
that guy on my front lawn
but
who's counting who's counting anyway
i'm over this project
all right so since the last time we met
i finally decided on a stain color for
the deck which is perfect timing because
my goal for day one of part two of this
deck makeover was to stain the bottom
half of the deck and also pre-stain the
top boards before installing the
railings so in order to get a quick and
even finish though i did want to use my
sprayer so first step was prepping the
area and protecting things in my yard
from overspray
now working in my backyard has been
amazing but i don't have the entire yard
set up with outlets quite yet so when
i'm working anywhere but on the actual
deck it can get a little tricky with
running cords across my whole yard i
also don't have that many cords so to
help keep me powered up no matter where
i'm working i partnered up with anker to
use their anchor 757 powerhouse portable
power station
this power station is a beast i was
honestly so impressed by it it has a
long-lasting battery that will keep my
projects powered up until i want to
power it down and it charges from zero
to 80 percent in just an hour so if i do
run out of juice i'm able to be back up
and running after a quick snack break
the premium lfp batteries will remain in
a healthy state even after 3 000
complete charge cycles with six times
longer battery lifespan than the
industry average and it comes with a
five year warranty which means i will be
powered up for many projects to come
i actually was able to plug in my
sprayer and my phone charger at the same
time and spray the entire perimeter of
my deck and the dozen and a half boards
i had in the backyard that i was
actually able to carry and i still had
88 of the battery power left over after
all that spraying
another cool feature of this portable
power station is that it has 1500 watt
output power which basically means i can
pretty much plug most of my tools into
it and i can even power up my home
appliances if i ever need to in an
outage situation there are definitely
smaller options available as well with
the same long lasting battery capability
which is great for other portable
projects on the go
if you're interested in being charged up
on the go i would highly recommend
checking out anker's line of portable
power stations by clicking on the link
to their website and the 757 below this
video
so back to business my original goal was
to get all of these boards pre-stained
because these are the boards i'm using
to rebuild my railings but mother nature
had a completely different plan in mind
all right check-in time so originally
the forecast today said that there was
no rain but now i just got an alert on
my phone that there's about to be a
heavy rain so
the socks mostly because i really wanted
to get these boards pre-stained before
my dad comes by tomorrow to help me with
the deck but i think what i'm gonna have
to do is just assemble this thing with
my dad and then
cover up the metal railings and
stain these boards once they're up it's
not ideal and it kind of sucks but it is
what it is so i'm gonna start to pack it
in before it starts to pour on me and i
hope that there's enough time for
whatever i painted to actually dry
why can't things be easy why can't
things be easy
i'll see you tomorrow friends
all right so yesterday was a wash like a
literal
wash because it started raining even
though
the weather man said it was not going to
rain so
you know what
forget you weatherman
today it's super hot out and i have my
partner in crime here
to help me
but we're just gonna put these railings
up and i guess i'll stain them once
they're assembled that was not the
original plan but it is what it is
because i gotta do what i gotta do while
i have dad here
here i am so i stole dad for the day
we're gonna get these railings up maybe
we're gonna do it okay it's gonna rain
today no it better not rain today all
right we're gonna go
away dad mood oh yeah right and get
these railings up
both in the shot i didn't check
nice shirt dad is this your catwalk i
like it my catwalk
so i mentioned in my last video that a
very special guest would be helping me
with the railing portion of my deck and
that is my dad because he is the best
but honestly having another set of hands
for this part of the project was so
helpful and we only had to make one home
depot trip during the entire thing are
you so proud of us or what so i shared a
little sneak peek of this portion of
this project on instagram recently and
got so many questions about the railing
system that i'm using for my deck so
let's break it down
as always though i definitely will link
to this product in the description box
below this video if anyone's interested
but long story short i decided to go
with something called the hoft system
which are essentially metal posts that
have grooves in the side so that you can
slide boards into the grooves they also
come with these really cool spacers so
that they very evenly space out all of
the boards for a really neat look i'm
not gonna sugarcoat it it is not the
cheapest option for deck railings or
privacy fences but a it definitely cost
me less than replacing our entire deck
and b it looks really cool so that's a
win
the system was way easy to install first
we just bolted all of the posts to the
actual deck itself and then i cut out
some boards and those boards just slid
right into those grooves no fancy
equipment or fasteners needed really one
thing to note is that there definitely
is a threshold for how far apart the
posts can be so that the boards stay
stable and they don't warp over time and
this threshold for this system is six
feet so we did have to put a post at the
maximum six feet apart or less
[Music]
what do you got show me i got my shim
so those are little
spacers that go in between each of the
boards they come with the metal post so
they slide right on into that groove
all the way down
and then the next row that we put in is
automatically going to be a half inch
gap between that's much better than half
but a half inch gap between this board
and the next because of those spacers so
check it out
not gonna lie having a second set of
hands around for this part of the
project was
game changing because while i cut all of
the boards on the miter saw my dad was
in charge of sliding all of the boards
into the grooves and making sure to add
the spacers honestly we were kind of a
dream team i'm not gonna lie
we're trying to decide if we want to rip
the top board or leave a gap up top i
can't decide what i like better i'm
gonna take we're gonna take a minute
here's what we're gonna do so we're not
sure where the top row is going to end
on the tall ones so we're going to put
everything in except for the top row and
kind of step back and check it out and
then worst case scenario we'll just kind
of we'd have to rip like literally a
quarter of an inch off of the board to
make it fit so we're going to play it by
ear i'm not gonna get too excited yet
spoiler alert i ended up ripping those
top boards just a little bit to make
those end caps fit but no big deal
we're hot
sweaty it's a really summer day to
decide to do this
so we got half of the deck done i think
it looks really great so far i still
wish i could have been able to pre-stain
the boards before hanging them but
luckily all the posts come covered in
plastic so i don't actually have to tape
them or cover them when i paint now i
can literally just paint and then pull
the plastic off so like that will save
me some time i have to do some sanding
the top row needs to be trimmed so we're
going to do that tomorrow because we're
tired a full dab mold right now yeah and
uh dad is crushing it right now check
this out ain't nothing that a hot shower
can't fix and a hot tub i'm gonna go
help him bring some more lumber in the
back get the tools away
tomorrow we're gonna get back out here
after my dad's full-time job maybe not
maybe
yes to finish the other half of the deck
and then the goal is tomorrow's monday
so tuesday i'd like to get out here and
stand and steam and then by wednesday
i'd like to really start getting things
together and start putting the finishing
touches on here because i really want to
be able to enjoy our deck by the weekend
so all right i'm gonna go help him
before he hurts himself see everyone
tomorrow
dad mathed wrong i have to move a post
now
that's the last time i let him do the
measuring
so of course i'm doing that thing where
i'm laughing at myself watching this
back because the fact that i thought i
was gonna get this thing done by
wednesday hysterical it actually took me
until saturday night to get it done but
at least it's done and i cannot wait to
show you what it looks like anyway
before i get ahead of myself dad and i
we championed it out and finished those
railings the next day and then i went in
there with a sander and then it was time
for the most satisfying part of this
project spraying everything with some
wood stain
like i mentioned i would have loved to
have pre-stained all of these boards but
this worked out completely because all
of those posts were covered in plastic
that i was able to peel away once i was
done
[Music]
this is good in an hour
i could put on a second coat
and i think i'm gonna beat the sun so
yeah once this is dry
i can finally get my patio furniture up
on my deck instead of all scattered
around my yard so
this is exciting
i'll see you tomorrow with some progress
friends good night
okay so typically i save little touch-up
detail stuff for last in a big project
but at this point my patio furniture was
already delivered and i wanted to get
the boxes up on the deck before i put
the railings on the stairs so i decided
at this point that's what i was gonna do
so i added a step up to our door that
leads into our kitchen i added some trim
work and at this point i was able to get
those boxes up there
now in terms of salvaging verse keeping
things i really wanted to keep these
lights so badly but upon further
inspection they were rusted out pretty
badly and were leaking so i decided to
swap them out for something else
at this point i also made sure to
silicone any gap between anything and
the siding on the house including the
lights and the door and the windows and
then it was time to do something that i
think is going to make a lot of you
happy because i did get a lot of
comments about this in my last video i
finally painted those exposed cedar
planks from that window swap out in our
kitchen
[Music]
okay friends
it's
chicken time
so
i personally think this deck is looking
pretty cool but there are definitely
still things i need to finish before i
can like enjoy it first up today we're
going i say we like i have a whole team
of people that's about to help me do
this project it's just me and the moral
and emotional support that i get from
all of you today so thank you for
helping me with this project anyway
today i'm going to be installing the
railings for the stairs it's super
simple same process as the railings up
top i want them to match completely the
only difference is that i obviously am
going to have to cut the boards for the
railings at like a weird angle i don't
know yet so we'll figure that out
together
but i'm going to basically just screw or
lag bolt the
posts
into the stone and the concrete i poured
a little concrete post there a couple
days ago um and
yeah oh one more thing other than that
so this board here i don't know if you
can see it on
camera but it's like really bowed out
this way it just is being a brat and a
half all the rest of the boards on the
deck look
phenomenal if i must say so myself so
i'm actually going to replace this board
while i'm working on cutting lumber and
staining lumber anyway today
luckily because this doesn't have like
the anchor post and up top yet i
actually i'm really happy i thought it
was proactive these can actually slide
on out so i'm gonna slide out all four
of these remove this one completely
slide these three down and then just
replace this one with one on top and uh
yeah should be good so i am going to
get started on the railings and then i'm
going to change because i actually like
this shirt and if i stain it i'm going
to ruin it and i don't want to ruin the
shirt and then
once i'm done i can finish
assembling all of my patio furniture i
kind of like sneak peek started and it
looks awesome and i cannot wait to have
all of this deck done because this has
been like a month-long process and i'm
frankly pretty tired so i'm ready for
like breakfast lunch and dinner on this
deck every single day until the end of
the summer and honestly probably until
after the end of the summer because i
actually love the fall and i'm so ready
for cold weather i'm so over this hot
weather okay now i'm having my own bread
attack there's a lot to do i just want
to finish up this project so
let's get started friends we got this we
could do this wow okay that was a lot so
pretty self-explanatory i think but
let's walk through it so first up i had
to attach those bottom railings to
something in order to have railings so
to do this i drilled directly into the
concrete using a masonry bit and then
use concrete specific fasteners in order
to secure it tightly
at this point i then switched my focus
to swapping out that warped board this
was a question a lot of people are
asking me about on instagram but this
system is really cool because it doesn't
use fasteners so i can literally just
replace any board i need to over time by
taking off the top railing covers and
then sliding out the boards and sliding
a new one back in it's kind of one of
the things i love the most about the
system
next up i began to cut the railings and
i found the angle by literally holding
the board up to the railings marking the
angle with a pencil and then matching
the angle on my miter saw alright
friends i hope you can hear me because
every time i
decide i want to talk to you my
neighbors decide they want a weed whack
or power wash today's power washing day
in case anyone was wondering anyway i
want to show you something okay
so
okay
this
fits great
but here's the problem
see what i'm looking at
even though
those boards are the same the railing
looks bigger
than this board here
the reason for that is because of the
angle it's at
but because these boards have to stay
uniform
i can only fix this problem so i'm going
to take this to my table saw i'm going
to cut whatever this difference is off
here eyeballing it looks like an inch
i'm going to obviously measure
um i'm going to cut let's say an inch
off
bring this board back
and then install it again and then it
should look like it matches up
hope that makes sense
it's hot today it's table sergeant
all right let's see what this looks like
yes
that looks much better
see
now it lines up
so i'm going to continue this pattern
for the rest of the railings
and then i think it's going to be easier
sand and spray these yeah maybe i'll
pre-stain everything okay
it's a process but we're making progress
so call back to earlier in this video
when i wanted to pre-stain all of the
railing pieces for the deck before
installing them luckily that's exactly
what i got to do with all of the pieces
that i needed to put on the stair
railings as well as that one that i
needed to replace
and just like i did for the deck
railings all i had to do was slide these
boards into those grooves use spacers in
between each one and yeah that's
literally all i had to do
[Music]
[Music]
oh
my goodness this is the last sport isn't
it it's the last board i don't think i
can even like explain the feeling like
the full body chills i just got when i
was like it's the last board once i'm
done with this board i'm literally done
with this production project eventually
i'm gonna do landscaping but it's just
been too hot and i don't want to kill
the plants that i'm trying to plant back
here but
other than the landscaping that means
like once i put this last board in it's
time for finishing touches
and it means i can enjoy my deck even
more exciting i'm gonna like spill the
beans at the end of this video why this
project is so meaningful and also why i
wanted to get it done even though it's
90 degrees out every day and uh
putting the
basically final piece in this puzzle is
just really cool feeling all right
here we go
i'm so excited
to put this last piece
on my deck
tell me it doesn't fit
i would not be surprised
that would be my luck
no we're in there
just gotta hammer everything down
[Music]
i'm done
i could literally cry i could literally
cry the happiest tears that i'm done
with this project i'm tired this has
taken me probably like honestly a month
to do and i'm over it so
but it's done so happy gotta get these
end caps on clean up the yard and then
tomorrow i can actually
decorate my deck tomorrow night i can
actually enjoy my deck and then in
september something big is happening
right here on this deck so i can't wait
to share with you all oh so excited so
excited that was really satisfying good
job sam
[Music]
now that the construction part of this
deck makeover project was done it was
time to focus on the part of the project
that i have been waiting for which is
getting my brand new patio furniture
from article out of their boxes and on
to our deck we have big plans for this
deck that i'll be spilling at the end of
this video but we basically wanted it to
not only look and feel inviting but also
be able to comfortably seat a lot of
guests so to do this i decided to split
the deck into a lounge area and a dining
area
for the lounge area i chose the collis
taupe gray sectional with matching
coffee table and they are so
red they are both made from solid acacia
wood that will weather to a soft gray
over time and they have these really
awesome black knotted rope accents and
storage shelves which would be great for
my obsession with hoarding plants and
pottery i also decided to ground this
area with a hand woven indoor outdoor
elko geogrug and honestly it is so cozy
out here
[Music]
[Music]
for the dining area of the deck we
decided to go with the lubeck tuscan
brown dining set which i've honestly
been drooling over for the longest time
this set includes a dining table and two
benches which were so easy to assemble
straight from the box although they do
offer assembly services for anyone who
needs it the set also comes with these
gorgeous powder coated steel legs which
you all know that i'm a total sucker for
it is seriously amazing how much my
article furniture transformed this
outdoor space and their furniture is
super high quality which means i'm gonna
be able to use it for years to come
which is awesome but now that this space
is furnished and ready to party are you
ready for the big reveal because i know
that i am
[Music]
[Music]
[Music]
[Music]
okay
check-in time
wow it feels so nice to sit down
my body is not happy it is so sore but
my soul is so happy i legitimately don't
think like this could have turned out
any better everything that i was like
cooking up in my brain really came to
life in the space and honestly i feel
like it turned out like even better than
i thought it would so i got a couple
questions about why i chose the hottest
month of the year to redo my deck and i
got you fam so a couple things one is
that with my full-time job in the
summers is the only time i have like an
extended vacation to do any work second
so really exciting news but chris and i
are gonna be getting married in this
backyard in a couple of months with our
closest friends and family and i really
wanted to make this space come to life
before the big day because we are gonna
be getting married right here on this
deck when we got engaged a few years ago
our dream was to buy a house and have a
backyard wedding that could like
function as a wedding but also a
housewarming thing and so buying this
house has been
really symbolic for us in a lot of ways
and this deck makeover especially
just feels so special also life-wise
like obviously this deck is not just for
our wedding we've never had an outdoor
space for as long as we've lived
together because we've always leased or
rented apartments and now we have a
space that is ours and we have done what
we wanted with it and i cannot believe
that this is our space so i want to be
like all machinists aside but i'm going
to get mushy for one more second there
were so many times during this project
in the 90 degree heat that i did not
want to finish or i just wanted to like
hire somebody and throughout this entire
process you have all been so supportive
especially on social media and just
keeping me real motivated so i do want
to say thank you all so much for just
being so awesome i hope my goal with
every project is that i hope to
inspire somebody to go out there and
tackle a project or try something new
and
this project in particular just had a
lot of really new things for me to try
so thank you for being supportive and
patient as i
got my ish together in this space okay
back to business so
because we're getting married in this
backyard in a couple of months there are
a couple more projects they do want to
tackle out here before the big day so if
that's something you're interested in
please make sure to click that
notification bell because i wasn't lying
i've been building my butt off this
summer there are tons of projects coming
your way and i am not missing a beat
that being said i hope that you will
subscribe to my channel if you're not
subscribed already if you are subscribed
already thank you you're awesome i love
you
and yeah
i'm gonna take the night to enjoy
my new deck and then tomorrow it's back
to business and it's back to business
probably on some projects on the inside
because i am over this heat for a while
so thank you all for being awesome thank
you all for being here i will see you
soon with a new project but until then
friends happy diying
[Music]
you