I Made Genevieve's 12 Dancing Princesses Ballet Dress! | DIY Barbie Movie Costume
Published June 12, 2023, 6:20 a.m. by Jerald Waisoki
Did anyone else grow up watching barbie? I'm totally obsessed with how this dress turned out, and I'm so excited to make another one!
//BUY MY sewing MACHINE!
https://amzn.to/3JqMQ9a
// MY DRESS FORM
https://royaldressforms.com/products/monica-light
// GREAT BEGINNER DRESS FORM
https://amzn.to/3Od4pgw
//LINK TO ARANEA BLACK CORSET PATTERNS
https://www.araneablack.com
//MY FAVORITE PRODUCTS + PRODUCTS I USED🪡
my sewing machine: https://amzn.to/3JqMQ9a
my serger: https://amzn.to/3uWF0ia
beginning dress form: https://amzn.to/3Od4pgw
electric scissors: https://amzn.to/3ujbLXR
hoopskirt: https://amzn.to/3x7JPIh
my camera: https://amzn.to/3KnhxwX
//OTHER FAVORITE PRODUCTS
https://www.amazon.com/shop/influencer-7006f0b1?ref=ac_inf_tb_vh
some links may be affiliated.
//FOLLOW ME!
Instagram: https://www.instagram.com/_alexandra.louise_/
TikTok: https://www.tiktok.com/@_alexandra.louise_?
🤍Support my channel🤍
https://ko-fi.com/alexandralouise
For all business inquiries, please email business@alouiseofficial.com
NO CUSTOM ORDERS
12 Dancing Princesses barbie Cosplay Costume Tutorial barbie Movie
#sewing #12dancingprincesses #barbie
You may also like to read about:
hi everyone welcome back to another
video today we're going to be making a
barbie dress and i'm sure you know what
i'm making from the thumbnail and title
we're going to be doing genevieve's 12
dancing princess ballet dress much like
everybody else i hope love the barbie
movies and i love their dresses so much
and i actually have made a few of them
in the past this movie is actually one
that i didn't really grow up watching
which is really weird because i think it
was released around the same time as the
other iconic ones i really always
watched barbie rapunzel princess and the
popper swan lake uh the nutcracker those
ones i did grow up on those and i never
really watched the 12 dancing princesses
until recently so we're gonna be making
her dress and i'm really really excited
because i'm going to be doing her
shorter ballet version instead of the
big ball gown one and this is kind of
different for me because usually i do do
full length dresses so i'm really
excited i already have all of our
materials including her ballet shoes
which i will be making and i'm really
really excited for this now one of the
reasons i actually want to do this dress
is because of the materials there's
something i've been holding on to for a
very long time that i thought would be
perfect for this dress and i've been
waiting for the perfect time to make it
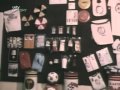
so let me show you what i have i just
got finished filming a tick tock with
all of these materials so i conveniently
have all of them in this pile right here
the only thing i don't have is just a
few like the details she has some gold
detailing some flowers i have the main
things but this right here is what i've
had forever joanne's sent me like this
little gift box a few months back and i
saw this and this dress immediately came
to mind because of the gold thing she
has on the front of the bodice so i'm
really excited to finally use it we have
some ballet shoes which i'll be
transforming no i'm not a ballerina
but
you have to have the iconic shoes and
then because her skirt is ombre we
obviously have some dye we're going to
be dying this white chiffon and then i
have the white matte satin for her
bodice i have the pink matte satin for
the top of the bodice and then i have
this because it's going to be the
underskirt under the ombre so let's
start ideally today i'll get both the
skirts done and that means cutting them
sewing them and then ombre dyeing the
top one which i'm very nervous for i've
never ombre died let's hope it goes okay
i don't really know what i'm doing i'm
not a professional dyer as you guys have
seen in the video where i dyed aurora's
fabric blue i have this left over from
the wedding dress that i just made and i
just didn't want to buy more fabric and
since it's going to be underneath i'm
sure it's fine i might just dye this
under fabric very light pink just so
that you don't really see the cream
either way it's fine we're not too
particular here so we're gonna start
cutting the fabric i think i'm gonna do
half circle skirts for each thing
yeah before i start cutting skirt we
gotta measure how long it's gonna be and
i think it's gonna be knee length-ish i
think that's what hers is at so like
maybe 25 inches
[Music]
that seems about right we'll do 25
inches
i always feel super boring recording
half circle skirts over and over so this
is me just doing yet another circle
skirt in another video of mine
[Music]
ah yes chiffon the devil's fabric don't
take my measuring tape honey buns we
have our skirts cut and there was a bit
of a plan change while i was cutting
them
this is the over layer that i will be
dyeing and i ended up doing one circle
skirt and one half circle skirt for a
lot of volume and then for the
underskirt i didn't want to do more than
a half circle skirt but i didn't have
enough of this fabric so the waist
radius wasn't big enough so i did have
to do a quarter skirt so this is three
quarters
of a circle right here and then the over
layer is
one and a half circles and we're gonna
sew them now and this is going very
smoothly sewing is gonna be not fun
because it's chiffon so we're gonna
start with the under layer first
i think we can all agree that nobody
likes to hem a skirt to make things
easier myself i'm going to have it with
horse hair this time i've only used this
one other time before when i made my
valentine's day dress you should go
watch that video i'm going to use this
horse hair it's going to give it volume
which i want since i don't want to put a
lot of effort into a petticoat and it
also is just really easy to use when you
want a quick way to hem a skirt so this
matte satin is going to be hemmed with
horse hair and then the skirt just needs
a waistband and it will be done and then
we'll have to make the chiffon skirt
[Music]
excuse me mabel what are you doing
no you're not allowed to be on the table
it's going good except
the dreaded bobbin is running out we're
gonna have to fill it up i don't think
it's gonna make it the rest of this hem
you really need to get down now okay
[Music]
go so we have the underskirt done and
now it's time to move on to this skirt
and i apologize if i'm going through
this too fast but i just feel like i'm
going to be so boring because i make the
same skirt basically for everything i do
it's either circle skirt has circle
skirt rectangle a gathered circle skirt
and i don't want to seem too boring so
let me know i don't know i just try to
rush through the skirt process because i
feel like you guys have seen a million
times and nobody wants to watch me make
circle skirts so we have this now we got
to do this one this one we are not gonna
hem it because since it's chiffon it's
going to stretch um in some of the
places where it's the bias so i'm going
to actually hang it up and stretch it
out and then re-cut it and then we'll
have it and then we'll dye it both
skirts are done now still need to dye it
this hem has given me such a nuisance i
already gave it a haircut a big haircut
as you can see and i thought it was done
warping and then i aimed it and it
warped some more and it's probably going
to even work more after i dye it and all
the wetness is like hanging on it so i'm
going to just dye it and if i have to
rehem it i will because that's really
bothering me but i did a zigzag stitch
if you can see before i dive in and
ombre i am going to do a little swatch
test because i don't want it to be like
too pink you know this is pink but if
you look this is really purple and this
is more reddish pink so i have the pink
and i have the red and i have the
fabric pieces that i'm going to dye and
i'm going to just
kind of feel out the shade before i
really dive into the actual thing so i
have my hot water and i'm just gonna go
for it and
hopefully the color is
how i want it to be okay that looks
purple
that's not even the right color that's
literally purple you're telling me i
don't know if the camera is picking that
up
they're calling that super pink
[Music]
super
pink
and it's coming up purple um
well
let me just see
what our super pink looks like
the tiniest little drop
no good thing i have red so i don't have
to go out anywhere that's nice that's a
plus that's very much reading purple i'm
gonna add some red because this is not
the vibe it's not the vibe stop i'm
gonna go in with a little bit of red and
if this doesn't turn out how i want i
think i might have to go to the store to
get another thing of red because i might
need a two to one ratio
i'm not supposed to be scientific when
you do this but i just i just go for it
okay this is looking
more like how
it needs to look so let me dip another
little piece
in oh that's immediately better okay
hopefully two things is enough if i do
an exact ratio of pink to red that's
coming up like that and i can imagine if
it soaks longer oh yeah i hope it's able
to get darker than this though the good
news is that i figured out the right
color but the bad news is that this
fabric does not hold dye very well it
needs to be way darker than this and i
just dipped it for quite a while and
this is as dark as i was able to get it
which is not good i need it way darker
what are you gonna do this is literally
the story of my life when i dye fabric i
never get enough dye
so this is me dyeing the fabric with two
bottles of dye and one pot of water and
spoil alert it did not work obviously so
then i was like oh let me add some
vinegar and that was a waste of vinegar
because it did not set the dye anymore
this fabric does not take dye very well
at all so that's like soaking in two
bottles of dye in really shallow water
and it barely took any even though this
was in for like 20 minutes and this was
in for two seconds it's still like the
same color so i went and got four more
so we're gonna really concentrate that
water hopefully this will darken up
the matte satin soaked in a bunch of dye
while i went to joann's for about 40
minutes and as you can see in this clip
it totally rinsed
white again and it did not hold any dye
just like the chiffon so i added four
more bottles of dye and i'm gonna tell
you right now it did not work it still
did not work and i was so so mad
welcome back it is day two and we are
here with another episode of failed die
job
so apparently the fabrics that i had
don't like to take dye
even after i put six whole bottles it's
barely turned from white to pink not
even an ombre these ends right here were
in for literally a second i dipped it in
and took it out this top up here i kept
in for about at least half an hour is
there an ombre no so you know what this
means
we get to go to joann's again
now am i totally mad about this no the
reason being because i actually is still
going to use both of these skirts and
it's just going to add to the floof and
i might not even have to make a
petticoat because this is pretty poofy
and yeah so my joann's never had
anything in stock that i need so i am
not going with faith that there's going
to be the right color let's go to the
store again and pray that they have
something
i'm actually in love with the sparkly
organza that i found at joann's and it
really reminded me of barbie with the
swirls so i cut a circle skirt out of it
and it has the best fluff and it's the
prettiest color and i think it's gonna
work very well
i'm really proud of the way that i
problem solved and was able to get an
ombre without actually having anything
ombre so as you saw it did not die
clearly but i am using those bottom
pieces for fluff so i did not have to
end up making a petticoat and then when
i was at joann's i had like this aha
moment in my head it was after i found
this pretty sparkly fabric but i knew it
still wouldn't be very strong of an
ombre so i bought six yards of fuchsia
tulle and you could probably already see
what i did i bought two cuts of three
yards so i folded the two cuts in half
stack them on top of each other and that
gives you four layers so there's four
layers and then i cut them layers just
like you would cut layers for hair so
that there's most gathers at the top so
it's concentrated pink and then as you
cut the layers down and it kind of
spreads out there's less and less pink
and it really did create this ombre
effect and then by putting this over it
it makes it all smoothed out so you get
a really subtle effect and i'm really
really proud of this and it totally
lifted my spirits because like i've said
before i always get so defeated so
easily in projects but it always ends up
turning out even better than i thought
it would it's just a lesson that you
just need to stick with it and i really
like this i might actually even cut
deeper layers because i think i want a
little bit more of an ombre but we'll
see but yeah you can totally tell
especially when you like spin it that
there's a lot of a great ombre effect so
i'm really really proud of that and
that's how we solve that problem and the
skirts are finally done and i can move
on to the point shoes finally going to
get started on these shoes before i go
any further i want to put a disclaimer
to all of the point shoe police
that no i'm not a dancer no i don't care
that you're going to say i'm going to
break my ankles when i already know that
i'm not gonna dance on them i don't even
think they're danceable because they're
like 20 shoes i got off of amazon like i
don't even think you could dance in
these if you wanted to so please don't
come to me with your comments because i
don't care so yes today we are going to
be decorating these and i'm really
really excited here is all of my
supplies i have the flowers i have these
to make bows and this ribbon to tie it
up and then of course we're going to be
painting it so the first thing i'm doing
is drawing the line on them where the
color switches because i don't want to
go into this blindly and so that way i
know
where to paint up to and i'm just going
to be using cheap acrylic paints for
these since i don't really need them to
be that durable i think that the acrylic
will be and actually acrylic doesn't
come out of fabric anyway so i think
that it will be a fine option
[Music]
i'm just going for it now and i'm just
gonna paint away i don't really think
there's gonna be much to it the paint
it's nice that it's um a thin
consistency so it really is going on
quite nicely and since this is all going
to be covered up by embellishments it
doesn't have to be the cleanest job i'm
noticing that it's um soaking into the
fabric i think it's the perfect color
there was so many options at the store
and the shades were so close yet so
different and i didn't know which one to
choose but i think this one is really
good i'm also going to i think make
another one of the sisters because i've
been having a lot of fun with this
project so if you want to let me know
who i should do in the comments that
would be greatly appreciated because i
would love to do another one and make
another pair of shoes i've got the first
coat of this shoe done so now i'm going
to move on to this shoe
both of the base shoes are painted now
and this one has had a moment to dry
excuse my hands i'm they're messy my
nails kind of match anyway and now that
it's drying she's looking really crusty
hopefully after a second coat it won't
look that crusty it's kind of hard to
pick up oh focus please it's hard to
pick up on the camera but it's kind of
blotchy probably because it's not all
the way dry
i have the both layers painted so now
we're going to do the raspberry darker
colored pink on the tips of the toes and
i don't know if this one is going to
need more than one coat since it is
darker so we'll just have to wait and
see the color is so perfect
i cannot wait this is one of those
things that you see as a kid that you
want so bad and i'm making it look real
and i'm it's gonna be so awesome
[Music]
the shoes are done
like i said these are not real point
shoes so don't come for me they are so
so cute here they are i think they
turned out so pretty so these are done
and now we can move on to what will
probably be the most complicated part of
this the bodice i love to use irania
black's corset patterns when i need a
really nice corset that goes over my
waist her corset patterns are amazing
and they are free and i will link them
down below if you want to download one
she has so many different options and i
am so grateful for the patterns that she
makes so i'll be using her sylvia
overbust corset pattern today and i have
all my pieces and lining cut out already
with matte satin and we are ready to do
this and i'm very excited i will be
changing it slightly at the neckline and
at the bottom of it because of the way
obviously that genevieve's corset goes
where it's kind of like a swoopy thing
so we'll just be trimming it off after i
sew it together step one is to sew the
lining together and then using this bias
tape we'll do the boning channels i will
meet you back when i finish sewing
together the lining and outer fabric and
once i have the boning channels sewn in
and they will just be on every seam and
it's going to be really easy
i have the lining sewn and now i want to
show you that i'm doing a gold piping on
some of the not all just some of the
seams for the outer layer because she
does have gold piping on hers and
originally i was gonna glue down a trim
and then i was like why am i being so
stupid just do some piping so
there we go i got the piping from hobby
lobby we're there now we have the lining
which i'm really proud of this is called
piping i've never done piping in seam
before i've only ever done it on a hem
or whatever and i think it looks pretty
good there's some spots where it's wonky
but i really really like it and then i
have the lining which obviously you can
tell i ran out of white and had to use
pink and then i had the boning channels
so now to finish this up i'm actually
going to put this on top of this sew
along this top line right sides together
flip it out so that i have a finished
top neckline and then for the bottom hem
i have some gold bias tape right there
that i'll finish up to put the gold on
and then we can start with the appliques
[Music]
it's really turning out good you can see
the corset start to form there's no
boning in this yet and i am just going
to be using zip ties just to be cost
effective but as you can see there is
the lining there's the front and the
next step i'll probably top stitch this
neckline down so that it's nice and
clean and then we'll add the zip ties
and that's my favorite part because then
it has the structure and it will suck
you in and it will be really really
really good
[Music]
hi guys excuse the pajamas it's the next
day and i finished the base corset and i
did decide i actually i guess i didn't
decide but i ended up not filming
because i don't know it just felt really
straightforward i already explained it
and i didn't even know what there would
be to film i thought it would be boring
so here it is finished it was very easy
now all that's left is to add grommets
which looking at these i don't think i
have enough so that means i'm going to
have to go to the store today
and then we can do the actual fun parts
which is the embellishment of it so
we'll have the gold
thingy right here and then i have a rose
some leaves very pretty and then of
course like the two pink gemstones i
might do embellishments first promise
last i'll have to count them let's do
the fun part now i was about to uh
stitch this on and i realized it
literally is a hotfix iron-on applique
so i saved like half an hour from sewing
this on and i'm just able to iron it
onto the front we're just going to
probably put it just right at the top
and iron it down
[Music]
today i'm finishing up the
costume by doing the pink
puff sleeves and the bodice so i need to
drape the pattern and then i'm going
gonna stop by hobby lobby and then i'm
gonna sew it all together and hopefully
i can finish it today because this video
needs to be out by friday
so let's drape it time lapse
[Music]
pattern is made except for the sleeves
and it's kind of like a crop top or kind
of like regency dress it was always a
fabric to do a whole bodice when you're
just going to see the top part so i'm
just going to sew it on to the corset
and you'll just see the pink part on top
now i'll take this off and cut the
fabric and then the one thing i don't
know about yet is how i'm going to do
the petals because i have no idea what i
want to do for those yet i'm going to
figure it out though
[Music]
for the hem of the sleeve i added this
really pretty lace onto the bottom and i
did the puffs and it's looking really
really cute and i'm going to add it to
the bodice ever since i learned how to
put a sleeve in flat it has changed my
life and if you don't know how to put it
in flat i highly recommend you learn
[Music]
so i haven't really filmed today because
i don't feel very well but i wanted to
show you guys how i'm going to make the
petals i already made them and it looks
really good so let me show you what i
did i found this iridescent stuff from
my elsa spirit dress that i just did and
i was like oh my gosh that would be
perfect and then i have some left over
white chiffon that i didn't dye for the
skirt so i sandwiched one layer of white
chiffon in between two layers of this so
i kind of folded it like that and then
cut the petals out and then i go through
and i zigzag around so it doesn't fray
and it turns out like this and i think
it's going to be
really really good and then i'm going to
add some rhinestones to it to make it
pop and i'm just going to make them in
different sizes and then we'll pin them
to the bodice and add the binding after
that i think it's almost going to be
done i just have to add this which i
have barely shown
on to the core set and things will be
looking good
[Music]
i just finished filming the reveal i'm
editing and i just want to say one more
time that i know that you're not
supposed to dance in pointe shoes but i
am going to pose because that's what the
dress is about and yes i know that i
probably tied them wrong and that's
because i was going for the way that the
movie tied it and i acknowledge that's
wrong i acknowledge that there's risks
to doing what i was doing and i hope
that you enjoy the reveal
[Music]
cool
[Music]
[Music]
[Music]
for my
you